SWCSCHD is the Banner Administrative Page that is used to create course sections for a particular term.
PLEASE NOTE: On February 4, 2019 Banner INB was replaced by Banner Administrative Pages.
If you do not have access to Banner Administrative Pages (formerly Banner INB) and need it, please complete the Banner Access Request form (login required).
You can log in to Banner Administrative Pages by clicking on the Banner Administrative Pages link found on the Dean or Chair page or the Employee page in myUVM. Access to this resource now requires multi-factor (Duo) authentication. A VPN Connection is required when connecting from off campus. Chrome is the recommended browser although it should work on any browser supported by UVM.
Once logged in, you should find yourself at the main menu. In Banner Administrative Pages there are several ways to navigate within pages:
- Keystroke combinations
- Mouse click
- Icon toolbar
Error messages and informational messages are displayed in the upper right corner. Clicking on the number in the top right corner causes these messages to disapperar:
The following functions are the ones you will probably use most often:
LIST
Keystroke: F9
Icon:
NXT-BLK (Next Section)
Keystroke: Alt + Page Down (if that does not work, try Fn + Alt + Page Down)
Icon: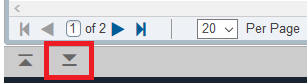
EXIT
Keystroke: Ctrl + Q
Icon:
DELETE/REMOVE RECORD
Keystroke: Shift + F6
Icon:
SAVE
Keystroke: F10
Icon:
ROLLBACK or CLEAR PAGE
Keystroke: Shift + F7
Icon:
Please refer to the Banner 9 User Guide for additional information.
Navigating to the Schedule Page
Once logged in, proceed to the Schedule of Courses schedule page by entering SWCSCHD in the search box on the Welcome page and pressing the Enter key.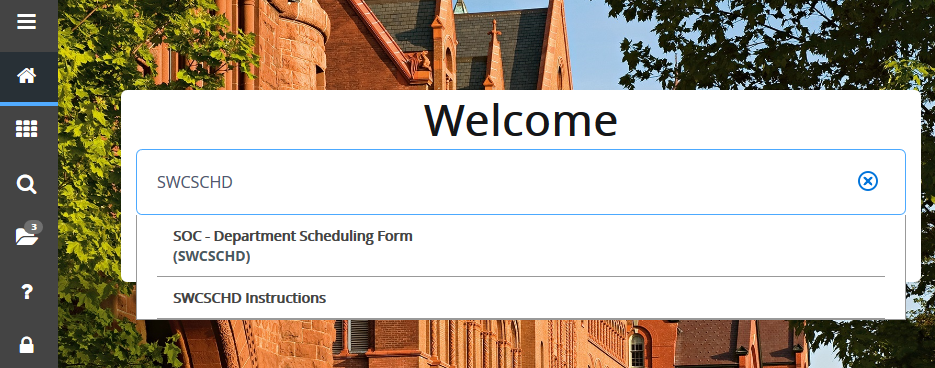
Navigating SWCSCHD
When you are working in the page, Banner functions should be used when the Auto Help Line specifies them. Navigation in the page itself is a little different from the rest of Banner:
After entering the Term and the Subject in the page header, use the NXT-BLK (Next Section) instructions above to move into the page.
Once in the page use the following commands to move around:
| To move forward in a line | Tab |
| To move backward in a line | Shift + Tab |
| To select an item from a list | Enter |
| To move to the next line | Down arrow |
| To move to the previous line | Up arrow |
| To return to the page header | Start Over |
Entering Information on SWCSCHD
Enter the Term and Subject in the page header (also called the Key Section) and use the NXT-BLK instructions above to move into the page. Terms should be entered using the following format:
YYYYMM - where YYYY is the year and MM represents the term:
01 = Spring (think January)
06 = Summer (think June)
09 = Fall (think September)
Example: 201909 = Fall 2019
Use the following guide to enter/modify section information:
| Field name | Did it roll? | Entered by | Description | |||
|---|---|---|---|---|---|---|
| CRN | N | SYST | This field is filled in automatically when the record has been SAVED; a negative number displays until that time. A new CRN is generated when courses roll. | |||
| Subj | Y | SYST | Autofills with subject entered in the key block at the top of the page. | |||
| Crse | Y | SYST | Enter the course number (or press F9 or [...] to select from a list). The number autofills on rolled courses and cannot be changed. It must be an active course number for the semester being entered. If a new course number is still in the approval process, please enter a special topics number (1990, 2990, 3990, 4990 etc.). | |||
| Sect | Y | DEPT | This field autofills on rolled courses but can be changed on the main screen. Sections with the same Subj/Crse combination must have different section letters. If you mistakenly enter two sections with the same section number (e.g., enter MATH 1212 A twice) you will get an Oracle error: You must select a different Sect value. Change the duplicate section value to something different. For example, if you have 2 sections of MATH 1212 A, you need to change one to MATH 19 B (or whatever section number will make it unique). Day division courses use A-Z for most sections. If you have more than 25 sections, such that all letters are used, start using double letters: AA, BB, CC. Linked lab/discussion sections should use letter of the lecture session plus 2 numbers if all linked sections meet in the same lecture (Lec A, Disc A01, Disc A02, etc.) or “L” plus two numbers if the students can choose from multiple lectures (Lec A, Lec B, Lab L01, Lab L02, etc.). Single digit labs should use the preceding 0 (A01, not A1, A02, not A2) so they will sort properly. If all students in a lecture meet as a group in the same lab, the lab should be entered as a second meeting pattern of the same section and not as a separate linked lab. CE courses use Z1-Z9 except for online and off-campus courses. | |||
| Schd Type | Y | DEPT | This field autofills on rolled courses but can be changed on the main screen. Press F9 or [...] to choose from a list of available types. All sections with the same Subj/Crse combination should have the same type if students should not be allowed to enroll in multiple sections. Courses, including Special Topics and linked sections should have different schedule types if students should be able to enroll in multiple sections (e.g., all lectures should be Ls and all labs Bs). | |||
| Insm Code | Y | DEPT | This field autofills on rolled courses but can be changed on the main screen. Press F9 or [...] to choose from a list of available types. Instruction Methods is a field that was added to ensure that sections were properly coded with respect to instruction method. Some courses have multiple instruction methods. Please select the appropriate value from the list and click OK or Enter. | |||
| Camp Code | Y | DEPT | This field autofills on rolled courses but can be changed on the main screen. M is for Day Division courses, C is for Continuing Education. | |||
| Title | Y | SYST DEPT | Displays but in most cases cannot be changed. A title may be changed for some courses such as special topics. Tab to the title field; if the cursor lands in the title field, the title can be changed. | |||
| Max Enrl | Y | DEPT | Enter the estimated enrollment for the section. Please give an accurate estimate. Note, if the section is going to be cross listed, this value should be the maximum enrollment you want for this section. Use the DPT NOTE to communicate the overall enrollment for the crosslisting. | |||
| Proj Enrl | Y | RO | For Registrar's Office course management use only. | |||
| Mult | N | SYST | An asterisk will appear if there is more than one meeting pattern. | |||
| Begin | Y | SYST DEPT | Spring and Fall Instructions Only Instructions for sections meeting in a General Purpose (GP) classroom: Sections using general purpose classrooms should use the standard begin AND end times for all of the days of the pattern. When entering a new section a window will automatically open with a list of standard meeting patterns. Please select from one of the options. When modifying an existing section, navigate to the “Begin” time and press Alt + Page Down to open the meeting pattern window. Click on the down-arrow under “Begin Time” and select the new standard time from the list. Entering a non-standard time for a section meeting in a GP classroom: When modifying an existing section: 1. Click on ‘Begin’ time and press Alt + Page Down. 2. Click on the arrow under “Requested Exception Ind” and select Associate Dean exception from the dropdown menu. Check the “GP Ind” box if it isn’t checked (click OK if warning window pops up) and enter the correct begin and end times. Enter the correct meeting days (M T W R F S U). Enter the requested room and save. 3. Enter ESMP note with detailed reason for exception request (See Notes section below for more info). When entering a new section from scratch: 1. Enter Subj, Crse, Sect, Schd Type, Insm Code, Camp Code, Title and Max enrollment. 2. When you tab over to the Begin Time field, the standard meeting time window will open. 3. Choose the begin and end times, and the days. If your intention is to enter a non-standard meeting pattern you must first choose a standard meeting pattern and continue with the steps below. Once saved, you will be able to go back and request the non-standard meeting pattern. 4. Enter “ONCMP” in Bldg and “SEE NOTES” in the Room field. 5. Enter instructor information and SAVE. 6. Go to Begin time field and press Alt + Page Down. 7. Click on drop-down arrow under “Requested Exception Ind” and select Associate Dean exception. Check the “GP Ind” box (click OK if warning window pops up) and enter GP room information. Save. 8. Enter ESMP note with detailed reason for exception request (See Notes section below for more info). Instructions for sections meeting in a departmentally scheduled room: When modifying an existing section, press Alt + Page Down. Uncheck the ‘GP Ind’ box, enter the time and days (M T W R F S U) the section meets. The departmentally scheduled room must be entered in the Bldg and Room fields otherwise an error will be generated. If the room isn’t loaded in Banner, please enter ONCMP in Bldg field and SEE NOTES in Room field. Enter the room information in the SOC Comments sections. When entering a new section, select ‘Cancel’ when the standard meeting pattern window opens, and enter a standard begin time and an end time using military time. Leading zeros must be entered (e.g., 0800 for 8:00AM). A military time guide is available at the end of this document. Enter the days (M T W R F S U) the section meets. The departmentally scheduled room must be entered in the Bldg and Room fields otherwise an error will be generated. If the room isn’t loaded in Banner, please enter ONCMP in Bldg field and SEE NOTES in Room field. Enter the room information in the comments sections. Instructions for sections meeting online: 1. Enter Subj, Crse, Sect, Schd Type, Insm Code, Camp Code, Title and Max enrollment. 2. When you tab over to the Begin Time Field, the standard meeting time window will open. 3. Click “Cancel” and tab over to the Bldg field. 4. Enter “ONLINE” in Bldg and “COURSE” in the Room field. 5. Enter instructor information and SAVE. Instructions for sections meeting off campus: 1. Enter Subj, Crse, Sect, Schd Type, Insm Code, Camp Code, Title and Max enrollment. 2. When you tab over to the Begin Time Field, the standard meeting time window will open. 3. Click “Cancel” and either enter time and days or tab over to the Bldg field. 4. Enter “OFFCMP” in Bldg and “SEE NOTES” in the Room field. 5. Enter instructor information and SAVE. 6. Enter location in SOC Comments. Summer Instructions All sections whether in a general purpose classroom or locally scheduled space must use the standard begin AND end times for all of the days of the pattern. When entering a new section a window will automatically open with a list of standard meeting patterns. Please select from one of the options. When modifying an existing section, navigate to the “Begin” time and press Alt + Page Down to open the meeting pattern window. Click on the down arrow under “Begin Time” and select the new standard time from the list. Instructions for sections meeting online: 1. Enter Subj, Crse, Sect, Schd Type = X, Insm Code = ONL, Camp Code, Title and Max enrollment. 2. When you tab over to the Begin Time Field, the standard meeting time window will open. 3. Click “Cancel” and tab over to the Bldg field. 4. Enter “ONLINE” in Bldg and “COURSE” in the Room field. Instructions for sections meeting off campus: 1. Enter Subj, Crse, Sect, Schd Type, Insm Code, Camp Code, Title and Max enrollment. 2. When you tab over to the Begin Time Field, the standard meeting time window will open. 3. Click “Cancel” and either enter time and days or tab over to the Bldg field. 4. Enter “OFFCMP” in Bldg and “SEE NOTES” in the Room field. 5. Enter instructor information and SAVE. 6. Enter location in SOC Comments. Instructions for travel sections: 1. Enter Subj, Crse, Sect, Schd Type, Insm Code, Camp Code, Title and Max enrollment. 2. When you tab over to the Begin Time Field, the standard meeting time window will open. 3. Click “Cancel” and either enter time and days or tab over to the Bldg field. 4. Enter “TRAVEL” in Bldg and “COURSE” in the Room field. 5. Enter instructor information and SAVE. Instructions for sections with pre- or post- travel on campus component: 1. Enter Subj, Crse, Sect, Schd Type, Insm Code, Camp Code, Title and Max enrollment. 2. When you tab over to the Begin Time Field, the standard meeting time window will open. 3. Click “Cancel” and either enter time and days or tab over to the Bldg field. 4. Enter “TRAVEL” in Bldg and “COURSE” in the Room field. 5. Enter instructor information and SAVE. 6. In the SOC Comments section enter the dates, times & location of the on-campus portion. 7. In the notes section indicate whether a GP room is needed for the on-campus portion. | |||
| End | Y | SYST DEPT | See notes above under Begin. Once you press SAVE, you can only edit this information, or add new information, by pressing Next Section or Alt + Page Down from one of those fields. | |||
| Days | Y | SYST DEPT | See notes above under Begin. Once you press SAVE, you can only edit this information, or add new information, by pressing Next Section or Alt + Page Down from one of those fields. | |||
| Preferred Bldg | Y | SYST DEPT | See notes above under Begin Enter the preferred building code, or press F9 to choose from the list. General Purpose classrooms have GP displaying next to them in the list. Once you press SAVE, you can only edit this information, or add new information, by pressing Next Section or Alt + Page Down from one of those fields. NOTE: Any BLDG information entered is only the requested preference and there is no guarantee the BLDG listed will be assigned until room scheduling has been completed. | |||
| Preferred Room | Y | SYST DEPT | See notes above under Begin Enter the preferred room code, or press F9 to choose from the list. Once you press SAVE, you can only edit this information, or add new information, by pressing Next Section or Alt + Page Down from one of those fields. NOTE: Any ROOM information entered is only the requested preference and there is no guarantee the ROOM listed will be assigned until room scheduling has been completed. | |||
| Schs Code | N | RO | For Registrar's Office room scheduling use only. | |||
| Partition | N | RO | For Registrar's Office room scheduling use only. | |||
| Mult | N | SYST | An asterisk will appear if there is more than one instructor. | |||
| Primary Instructor | Y | SYST DEPT | Press Next Section or Alt + Page Down if you need to enter multiple instructors. Instructors must be active for the term. Percentage assignments for multiples instructors must equal 100%. | |||
| % Resp | N | SYST | Percentage that is assigned to primary instructors. | |||
| Cr | Y | SYST | This field autofills for fixed credit and is blank for variable credit courses. Depts should only enter credit hours for sections of variable credit courses and you want it to be only a specific number of credits (i.e., the course is variable 1-6 and you want this to be a 3 credit section). In all other cases, leave this field blank. | |||
| Gradable | Y | SYST | Defaults to Y, RO will change if the section is not gradable. | |||
| Link ID | Y | RO | For linked courses (with Link Conn). DEPT reports in SOC Comments and RO enters in Banner. | |||
| Link Conn | Y | RO | For linked courses (with Link ID). DEPT reports in SOC Comments and RO enters in Banner. | |||
| Perm Ind | Y | DEPT | Permission indicators can be attached to a section to prohibit registration for the section until the appropriate approval (electronic override) is granted. | |||
| Note | N | RO DEPT | If you have not SAVED yet, you must press SAVE (F10) before you can enter information. Press Next Section or Alt + Page Down to access the popup box for Note information. The Note types used are: ESMP – Enter detailed reason for requesting an exception to a standard meeting pattern. ROOM – Any information about the room we need to know (eg. needs tablet arm chairs and a computer). Media codes are provided for your convenience. INSTR - Instructor name if it cannot be selected. FEE - Fee code to be used, as well as the amount. DPT - Any other information the Registrar’s Office needs to know that is not appropriate for the SOC comment (which students read), such as title changes, Service Learning, grade mode, etc. CERF – Operating Expenses (entered for CE courses only). Notes have 2 components, a note type and the note contents. · Press F9 to select them from the list. · Tab to the Instructions. · Enter the information related to the instruction type you have chosen. | |||
| SOC Printed Comment | Y | DEPT | You must Next Section or Alt + Page Down to enter the information. Information should be limited to what you want the students to know. Any other information should be entered as NOTES. Use this field to tell us: · If the course is cross listed. Be sure all departments submit their section and that times,etc agree. · If there is a fee associated with the section. Indicate the fee amount. · If prerequisites, co-requisites apply to the section. · If there are college, class, maj/min/conc, or level restrictions. | |||
| Sect Desc | N | DEPT | Next Section or Alt + Page Down. If the Subj/Crse allows changes. You can cut the text from a document and paste into this field. | |||
| Fee Ind | Y | RO | DEPT requests in FEE Note and RO enters in Banner. Indicate fee amounts, detail code, flat or per credit. | |||
| Attr Ind | N | RO | For RO use to enter course attributes. | |||
| Res Ind | Y | RO | DEPT requests in SOC Comments and RO enters electronically enforceable restrictions in BANNER. A section may be electronically restricted (including or excluding students) by the student’s College, Major/Minor/Concentration, Class, or Level. · Restrictions between these 4 areas have an AND relationship. · Restrictions within these 4 areas have an OR relationship. When using exclude restrictions then, excluding students with a given major and excluding students with a given level does not only exclude students with the major and level, it excludes all students with the major and all students with the level. Instead of the "AND" creating a smaller group, the "AND" relationship in excluding creates a bigger group of excluded students. To avoid confusion on class restrictions, please use the words “minimum” or “only” to clarify the class standing of the students who should be allowed to enroll; “Minimum sophomore standing” (exclude first-year students) would allow students with at least sophomore standing to enroll; “Sophomore standing only” (include sophomore students) would allow only students with sophomore class standing to enroll. Unless otherwise instructed we will automatically put level restrictions in place to prevent day division students from registering in PACE sections and to prevent PACE students from registering in day division sections. These restrictions will automatically be removed when level restrictions are dropped. | |||
| XL Grp | N | RO | DEPT reports in SOC comments and RO enters in BANNER. Crosslisting does not happen automatically. Each department needs to enter their respective courses. Please be sure the meeting patterns and instructors match and that each course lists the crosslist information in SOC Comment. The maximum enrollment for each section in the crosslisting should be entered for that section. The maximum enrollment for the combined sections should be reported in the SOC Comment. | |||
| Credit Hrs Low | Y | SYST | Indicates the credit amount for fixed credit courses and the low credit value for variable credit courses. This information is pulled from the catalog entry for the Subj/Crse and cannot be changed. | |||
| Credit Hrs High | Y | SYST | Indicates the high credit value available from the catalog entry for the Subj/Crse. | |||
| Gmod | Y | RO | DEPT notes in DPT Note and RO enters in BANNER. | |||
| Ptrm | SYST | Defaults to 1 – Full Term | ||||
| Part of Term Start Date | Y | SYST | Defaults to full term start date, RO can change dates if necessary. | |||
| Part of Term End Date | Y | SYST | Defaults to full term end date, RO can change dates if necessary. | |||
| Weeks | Y | SYST | Calculated Based on Start and End Dates. | |||
Military Time
| 12:00AM | 0000 | 12:00PM | 1200 | |
| 1:00AM | 0100 | 1:00PM | 1300 | |
| 2:00AM | 0200 | 2:00PM | 1400 | |
| 3:00AM | 0300 | 3:00PM | 1500 | |
| 4:00AM | 0400 | 4:00PM | 1600 | |
| 5:00AM | 0500 | 5:00PM | 1700 | |
| 6:00AM | 0600 | 6:00PM | 1800 | |
| 7:00AM | 0700 | 7:00PM | 1900 | |
| 8:00AM | 0800 | 8:00PM | 2000 | |
| 9:00AM | 0900 | 9:00PM | 2100 | |
| 10:00AM | 1000 | 10:00PM | 2200 | |
| 11:00AM | 1100 | 11:00PM | 2300 |