|
 |
Line.
-
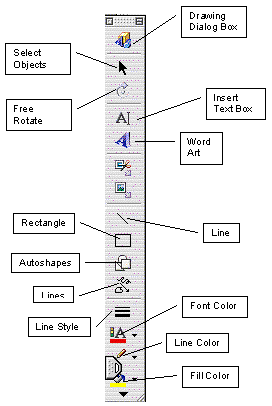
Click on the "Line" button. Use the cursor
to draw a line.
-
Double-click on the line. Use the "Format Autoshape" dialog box to create
a 3point dashed arrow as shown to the left.
|
|
 |
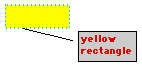
Rectangle.
-
Click on the "Rectangle" button. Use
the cursor to draw a rectangle.
-
Use the "Fill Color" button to create yellow fill.
-
Double-click on the rectangle.
-
Use the "Format Autoshape" dialog box to create the border shown to the
left.
|
|
 |
Text Box.
-
Click on the "Insert Text Box" button.
Use the cursor to draw a text box. Type in the text.
-
Double-click on the text box to open the "Format Text Box" dialog box.
-
Use the "Lines and Colors" tab to create black fill and a 1.5 point gold
border around the box.
-
Use the "Font" tab to choose "Lucida Handwriting", 9 point. Color it light
blue.
-
Use the "Margins" tab to set the left and right margins to 0.1, and the
top and bottom margins to 1.5.
|
|
 |
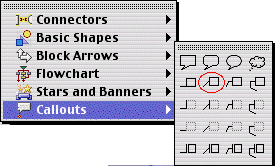
Call Outs.
-
Click on the "Autoshapes" button. From
the drop-down menu, choose "Callouts"
which is indicated by the red oval.
-
Use the crusor to create the callout on your worksheet. Type in the text
as shown at the left.
-
Double-click on the callout to open the "Format Object" dialog box.
-
Use the "Lines and Colors" tab, the "Font" tab, and the "Margins" tab to
create the image shown to the left.
|
|
 |
Stars and Banners.
-
Click on the "Autoshapes" button. From
the drop-down menu, choose "Stars and
Banners".
-
All of the options for callouts are vailable for stars and banners.
|
|
 |
Block Arrows.
-
Click on the "Autoshapes" button. From
the drop-down menu, choose "Block Arrows".
-
All of the options for callouts are vailable for block arrows.
|
|
![[Octagon AutoShape]](octagon.gif) |
Basic Shapes.
-
Click on the "Autoshapes" button. From
the drop-down menu, choose "Basic Shapes".
-
All of the options for callouts are vailable for basic shapes.
-
Notice that the shape can be changed or resized using the open box handles
and other adjustments specific to each shape.
|
|
 |
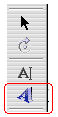
Lines.
Click on the "Lines" button. From
the drop-down menu (shown to the left), draw a:
-
straight line
-
arrow
-
double-ended arrow
-
curved line
-
click each time you wish to introduce a different curve.
-
double-click to complete and escape.
-
The open box handles can be used to reshape or resize the completed figure.
-
freeform
-
click each time you wish to introduce a different line.
-
double-click to complete and escape.
-
The open box handles can be used to reshape or resize the completed figure.
-
scribble
-
click the last button in the second row, click the mouse in the worksheet
and hold down the left button while you draw the design. Let go of the
mouse button to stop drawing.
|
|
 |
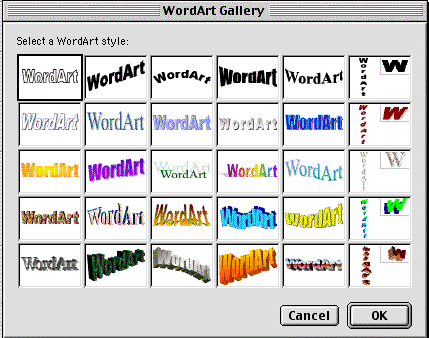
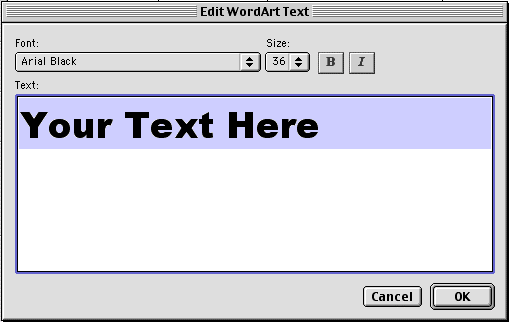
Word Art.
-
Click on the "Word Art" button (shown
to the left). From the dialog box which
appears, choose the style of Word Art which is desired.
-
Select the style and click on "OK".
-
An edit box appears. Type n the text, and
select the font, size and style.
-
Click on "OK" to insert the Word Art into the worksheet.
|
|
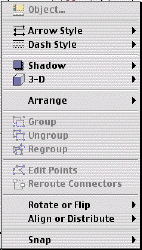
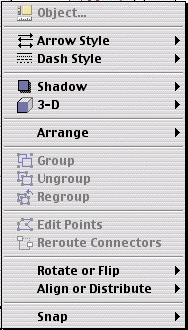
From the "Drawing Toolbar", click on the "Drawing"
button. The "Drawing Dialog Box" will
appear.
|
|
 |
|
| "Arrow Style" and "Dash Style" are
redundant functions which we have already seen above. |
| "Shadow" and "3-D" are self-explanatory. |
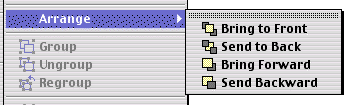
| "Arrange" allows
the user to define how objects overlap each other. |
| "Group" or "Ungroup". Allows different drawing
objects to be grouped as a single object, so that they can be moved, or
otherwise manipulated together. |
|
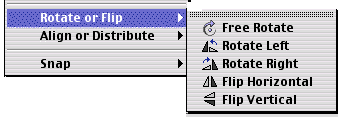
| "Rotate or Flip"
allows the user to specify the orientation of an object. |
| "Align or Distribute". Self-Explanatory |
"Snap"
-
"To Grid" helps to orient a drawing object with the grids on a worksheet.
-
"To Shape" helps to orient drawing object to another drawing object.
|
|

