Outlook for Mac 2011 to Manage UVM Email
1.
Open FinderàApplicationsàOffice 2011

2.
Find Outlook and double click the icon

3.
At the opening screen, ‘Add Account’
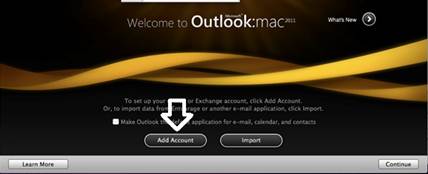
a.
NOTE: If
you have already configured an account in Outlook, then:
i.
From Outlook open ToolsàAccounts
ii.
Click the ‘+’ sign in the bottom left of the
Accounts window and create a new E-mail account.
iii.
Skip to step 5 to complete the Account
information configuration window
4.
Select
‘E-mail Account – POP or IMAP…’

5.
Enter the following information in the Account
information page:
a.
Enter your UVM E-mail Address (e.g. Thomas.Chittenden@uvm.edu)
b.
Enter your UVM NetID
Password
c.
Enter your UVM NetID
in the Username field (e.g. tichitte)
d.
Set the type of account to be IMAP
e.
Set the Incoming server to be imap.uvm.edu
f.
Check the box that says ‘Use SSL to connect (recommended)’
g.
Set the Outgoing server to smtp.uvm.edu
h.
CHECK the
box that says ‘Override default
port’ and change the port to 587
i.
Check the box that says ‘Use SSL to connect (recommended)’

6.
Click Add Account
7.
In Account Description, enter UVM (or UVM Email…)
Be sure the Full Name is your Full Name (this is the name recipients of your
email will see from messages sent via Outlook:Mac
2011).

8.
In ‘Outgoing
Server’, click on ‘More Options’

9.
Change the Authentication setting from ‘None’ to
‘Use Incoming Server Info’
10.
Click OK and then close the accounts window by
clicking the top left corner red button.
Outlook:Mac 2011 should now be
configured to manage your UVM Email.
Follow these steps to configure Outlook to show UVM addresses in your
directory search results.
11.
Open
OutlookàToolsàAccounts

12.
In the
bottom left corner, click on the ‘+’ sign and add a ‘Directory Service’

13.
Enter
‘ldap.uvm.edu’ as the LDAP server and check the ‘Use SSL to Connect (recommended)’

14.
Click
‘Add Account’
15.
With the UVM Ldap.uvm.edu account selected,
click on the ‘Advanced’ button in the bottom right of the window.

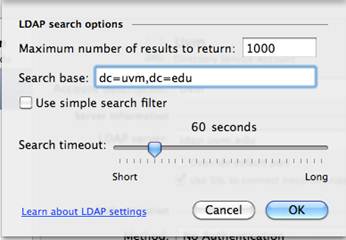
16.
In the Advanced window of the LDAP directory
service, enter ‘dc=uvm,dc=edu’ and click OK.
You should now see UVM accounts appear when you are
searching the directory for user names:
