The Vibratome
One of the techniques I’ve been wanting to learn for a long time, is how to section. Sectioning allows you to take thin slices of roots or nodules, or whatever tissue you want to take a look at. It allows you to examine the internal structure of whatever organ you are interested in. The kind of sectioning that Uli does most frequently is with a machine called a Vibratome. The vibratome doesn’t make particularly thin sections, but it does allow you to make sections of live tissue. This is very different from what you see in fixed tissue. It means you can also look at GFP staining in deep tissues, that you would not be able to visualize easily using a confocal. This is particularly important for us, as Medicago roots are much thicker than Arabidopsis roots, and nodules are even thicker than that!
The Vibratome

Preparing tissue for sectioning:
This part is actually very easy. You embed the tissue in agarose (DNA-grade) in little molds. I didn’t bring my camera to Canberra, so I’m dependent on the photos people there took for me. So I don’t have a picture of the mold, but it is a standard kind of mold. For this technique to work, the agarose has to be about the same density as the tissue you are sectioning. For roots, 3 to 3.5% agarose works well.
- Melt the agarose in the microwave. You will need to make up about 100 ml at a time. Even though you don’t need that much, if you have too little it will evaporate too fast when you keep reheating. Let cool a bit before using.
- Using a P1000, pipet a little bit in the bottom of the mold. It should fill it about halfway. Make sure it gets into every corner.
- While the agarose gels, prepare the tissue. Cut short sections of root, or root plus nodule. The segment should be no longer than about 4 mm. Use a sharp scalpel (fresh) to cut.
- Place the cut root segment on a kimwipe. Turnover to make sure that it is really dry. If it is wet, the agarose won’t stick to it properly and you won’t be able to section it. Be careful though: if you allow the root to really dry and shrivel, there will be nothing to look at!
- When the root has been dried off and the agarose is set, place the root on the agarose. Try to line it up so that it is fairly straight, but don’t worry too much – you can always trim the block.
- Remelt the agarose if necessary (it will probably have cooled too much to pipet at this point). Allow it to cool and pipet gently over the roots, trying not to move them. Let the agarose gel.
Trimming and Mounting the block
- Using
a pair of fine forceps (like the ones used for crossing), pop out the
block.
- Place
on a cutting mat with a grid printed on it. Line the root up carefully
along one of the lines, so that the bottom of the block is just below a
perpendicular gridline. This part is important. If the root is at an angle
here, you will never get straight sections.
- Using
a sharp razor blade, cut the bottom of the block using the perpendicular
line as an exact guide.
- Place
a small dot of superglue on the top of a scintillation vial cap (or mounts
that come with the machine, but this makes a good replacement). Carefully
place the cut edge of the block on the superglue. Wait a few minutes for
it to fully set.
Preparing the vibratome for sectioning
- Place
a fresh razor blade in the clamp. Replace razor blade after every 3
sections.
- Fill
the well with water, so that it just reaches the bottom of the razor
blade.
screw Place cap here Razor
blade Cap
for mounting
![]()

![]()
![]()

- Clamp
the scintillation cap with the agarose block on it in the space below the
razor blade. Tighten the screw (in the water) until it doesn’t float away.
Sectioning
- Start
sectioning! Use the fine forceps to pick up the thin slice of agarose as
it comes off. Place in drop of water on slide. Keep putting the slices
there as they come off. Add more water as needed. Cover with large
coverslip.
- Move the
dial after each slice to move the blade lower. For sections that you want
to keep, 100 mm is a good depth.
If you cut any thinner, you will break open all the cells and won’t be
able to look at the contents. Even at this thickness some will be cut, of course.
To quickly get down to the part of the block you are interested in, go
down in 300mm sections.
- Settings: The blade will move forward at whatever speed
you set. This is really just dependent on how fast you are comfortable
moving. It will vibrate left and right at a certain speed. This parameter
is different for different tissues and species. You just have to figure it
out for what you want.
Visualizing
- Look
at sections on a fluorescent microscope. If you have the UV on, you will
be able to see the flavonoids in the cells. You can switch to GFP to see
GFP Rhizobium or other GFP labels. You don’t need to seal the slides,
because they won’t last anyway, since the tissue is fresh.
A nodule section (about 100 microns) visualized with UV
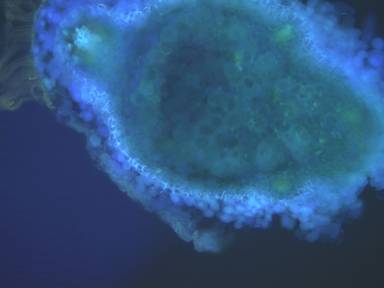
Note the vascular bundle in the root cross section (left
upper right) and the orangy root hairs. The very bright cells (besides the
xylem) are the endodermis, both of the nodule and the root. The fuzzy blue
cells are cortex cells of both the nodule and the root. They are expression a
blue flavonoid. The blue cell wall staining of the endodermis and xylem are due
to cell wall autofluorescence – not a flavonoid.
Another section of the same nodule visualized with GFP.
(This nodule was infected with GFP rhizobium.)
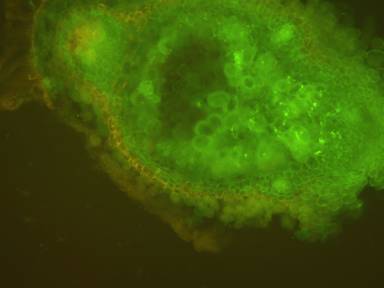
The very bright squiggly lines on the right side of this
nodule are the infection threads containing GFP rhizobia. You can also see the
fainter infected cells more centrally, or below the infection threads. Here the
autofluorescence sometimes looks orange.
Root sections also look very cool.

This one is next to the top of a nodule, but you can clearly
see the root hairs around it and the radial symmetry of the root, which is
broken where a nodule forms. All the blue cells are chock full of flavonoids.
All in all, this took me one hour to section a block, mount
it and capture the images. Add perhaps another half hour for making the blocks.
Really, not bad at all!