The VACC Open OnDemand instance offers several choices of Python to choose from. The Anaconda distribution(s) with over 250 installed packages will cover most common scenarios except some specialized packages, e.g., Torch, TensorFlow.
This page gives a step-by-step guide to installing a particular set of Python packages in a Conda virtual environment and then setting that virtual environment up so it can be used with the JupyterLab application. Similarly, a virtual Python environment that was created with either virtualenv or venv can be accessed in JupyterLab via a kernel.
Create a Conda virtual environment and install the kernel
These instructions assume that you are starting with a ‘clean slate’, by which we mean there are no active Conda environments. This also assumes that you want to create the virtual environment in the standard path ~/.conda/envs. If you want to save it elsewhere, see the official documentation for details on setting a --prefix. All of the commands that follow are preceded by a $ prompt. If you copy and paste, do not copy the prompt. Lines that start with a # are comments that simply provide information. To be extra safe, we deactivate any Conda environments. If you don’t have an active Conda environment, running the deactivate command is harmless and will simply tell you that The command: conda could not be found. This is a safety measure for those for whom it is found.
$ conda deactivate
The first thing we want to do is insure that we have only the module(s) needed for our project, which is biology for this example. To do that we first remove all loaded modules, then load the one(s) we need.
# Clear modules
$ module purge

# Load the needed modules
$ module load python3.11-anaconda/2023.09-0
The next step is to source the conda.sh file. This will avoid having to run conda init which would “permanently” add the Conda setup commands to your ~/.bashrc file.
$ source ${ANACONDA_ROOT}/etc/profile.d/conda.shNext, we create the environment, making sure to specify the Python version explicitly so that it matches one of the available options in Open OnDemand. In this example, we name our environment my_bio_env. You can substitute any name that is appropriate for your environment. Additionally, note that the name given to the kernel does not have to match the name of the conda environment. We use the same name in our example below for simplicity.
$ conda create --name my_bio_env python=3.11

# Enter 'y' when asked: Proceed ([y]/n)?

$ conda activate my_bio_env

# Use the '-c' option to specify a channel if any of your
# packages need to be downloaded from a particular site
$ conda install -c conda-forge pandas numpy pySlim scikit-allel msprime

# Enter 'y' again, when asked to proceed
# Install ipykernel so that you can access your environment from
# the JupyterLab Launcher menu (use -y to answer yes automatically)
$ conda install -y ipykernel

# Installing the kernel
$ python -m ipykernel install --user --name=my_bio_env
# Deactivate when finished
$ conda deactivate
Using the new kernel with JupyterLab
Go to VACC Open OnDemand and bring up the JupyterLab / Jupyter Notebook form and select JupyterLab mode. Under the Python Version field, be sure to select a version that matches the Python version used when you created your environment. In this case, python3.11-anaconda/2023.09-0 would be the appropriate version to choose.
Once your JupyteLab session has started, the interface you see will depend upon how you ended your previous session. If you left a notebook open, it will likely be open at the start of your new session, as below. In that case, you can either close the open file via the File menu or via the X on the tab and you will be left with an open Launcher tab. Or you can simply click the + symbol (indicated by the red arrow in the screenshot below) next to the open file tab and a new tab with the Launcher will open.

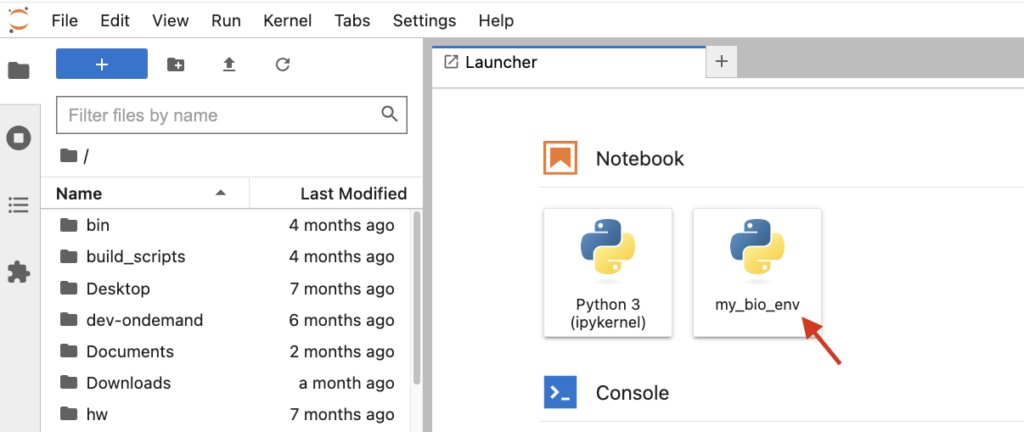
In the Notebook section of the Launcher tab, you should see my_bio_env (or the name given when you created the kernel) listed as an available kernel (see screenshot below). Clicking the icon with the kernel name will open a new notebook with the previously created environment loaded as the kernel.
Using the new Conda environment from a terminal or in a SLURM batch job
To use the new Conda virtual environment, in this case named my_bio_env, from within a terminal, enter the following commands:
$ module load python3.11-anaconda/2023.09-0
$ source ${ANACONDA_ROOT}/etc/profile.d/conda.sh
$ conda activate my_bio_env
If you want to run a batch job that uses the Conda environment, copy the above commands into your batch script. Do not include the $ at the beginning of each command.