
Guests can join a Teams meeting, whether they are affiliated with UVM or not. These are the steps we recommend taking to invite a guest to join a class meeting via Teams.
Create a stand-alone Teams meeting
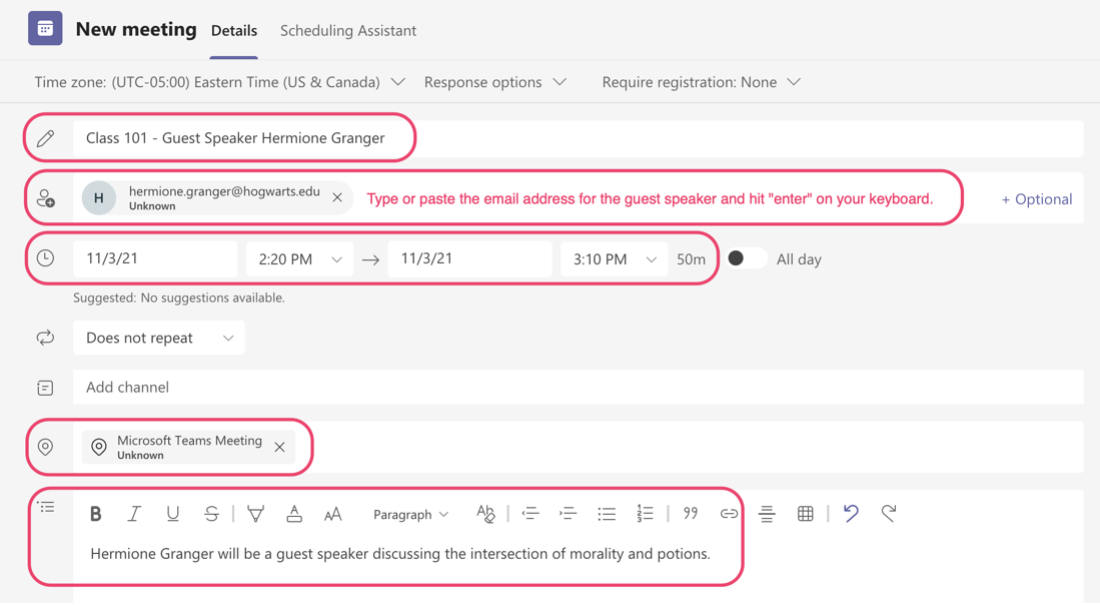
- Go to Calendar on the left side of the Teams app and select New meeting in the top right corner.
- Fill in these fields:
- Title: This will serve as the subject line for the email sent to the guest speaker and will also display on the calendars of any invitees.
- Required Attendees:
- Add the email address of the guest speaker.
- Include any additional people who will be joining the class remotely:
- To invite your entire class, begin typing the name of the class using the format PrefixNumber (e.g., BIOL001 or AS020 or GRNS300) and then click on the correct option from the auto-populated list.
- To invite individual students, begin typing the name of the student, starting with their full first name or begin typing the student’s NetID and then click on the correct option from the auto-populated list.
- Date & Start/End Times
- Location: You may want to type “Microsoft Teams Meeting” as a reminder to your guest speaker.
- Details: You can add details, if desired. Any invited attendees will be able to see these.
- Click Send at the top right corner. This will automatically email your guest speaker with details about the meeting along with a “Join Meeting Link.”
- Adjust any Meeting Options to fit your needs:
- By default, your guests will bypass the lobby. If you’d prefer that they start in a lobby until you admit them, adjust the “Who can bypass the lobby?” setting to “People in my organization.”
- By default, you will have to promote your guest to a presenter role for them to be able to share their screen. If you’d prefer they automatically have this privilege, change the “Who can present?” setting to “Everyone.”
- You can always edit this meeting invitation (for instance, to add remote student attendees) by returning to your Calendar on the left side of the Teams app and double-clicking the meeting.
Send your guest information about what to expect
- If your guests are not using the Desktop app for Teams, then they’ll need to use either the Chrome or Edge browser to join the meeting. Other browsers (Firefox, Safari, etc.) are not currently supported by Microsoft for joining meetings. This article has additional information about Joining a Teams Meeting as a Guest, which you may want to send to your guests, or peruse to send them the pertinent details.
- Tell your guest whether or not they should expect to initially be admitted to a lobby (based on the Meeting Options you’ve selected).
- Tell your guest whether they’ll be able to automatically present or whether you’ll need to promote their role to presenter once they’ve joined the meeting.
- Discuss whether they are comfortable with you recording the class session.
- If there will be remote students:
- Discuss how you expect the chat will be used and who will monitor the chat.
- Discuss how students can raise their hand to ask a question and who will monitor the participant list for hands.
- If there will be in-person students:
- Discuss how you’ll notify the virtual guest speaker when someone in the room as a question or comment.
Notify any remote students to access the meeting through their Teams calendars
This stand-alone meeting has a distinct meeting link. Even if students are used to joining your class through a Channel, for this meeting, they must go to their Teams calendar to join.
Join the meeting & support your guest speaker
- On the day and time of class, join the Teams meeting.
- If applicable, admit your guest from the lobby when you are notified they’ve arrived.
- If applicable, promote your guest to a presenter role so they can share their screen.
- If you’re teaching an in-person class, use the classroom podium computer and project it to the screen in the room so your students can see your guest speaker. Do an audio check to make sure the guest speaker can hear you and you can hear them. Use the Classroom Guide to troubleshoot issues.
- Set expectations for the use of chat by students and monitor chat submissions.
- Set expectations for the use of virtual raised hands and monitor the participant list for hands.
- Set expectations for in-person questions and comments and how they’ll be communicated to the guest speaker.
- Record the meeting, if desired.
Do a trial run
You and your guest speaker may want to do a trial run to make sure the technology works as expected. If so, create a separate Teams meeting (inviting the guest using the same steps outlined in this article) in which to practice. For in-person classes, it may be wise to do this practice session from the classroom in which you’re teaching, to check that the tech works as expected.
Where do I find the recording?
If you recorded the class session, afterward, you will be able to locate it in your OneDrive cloud storage.