
In Brightspace, the quiz tool is used for quizzes, tests, and exams. This page for instructors explains how to set up a quiz, add questions, choose settings, present it to students, and more.
First Steps
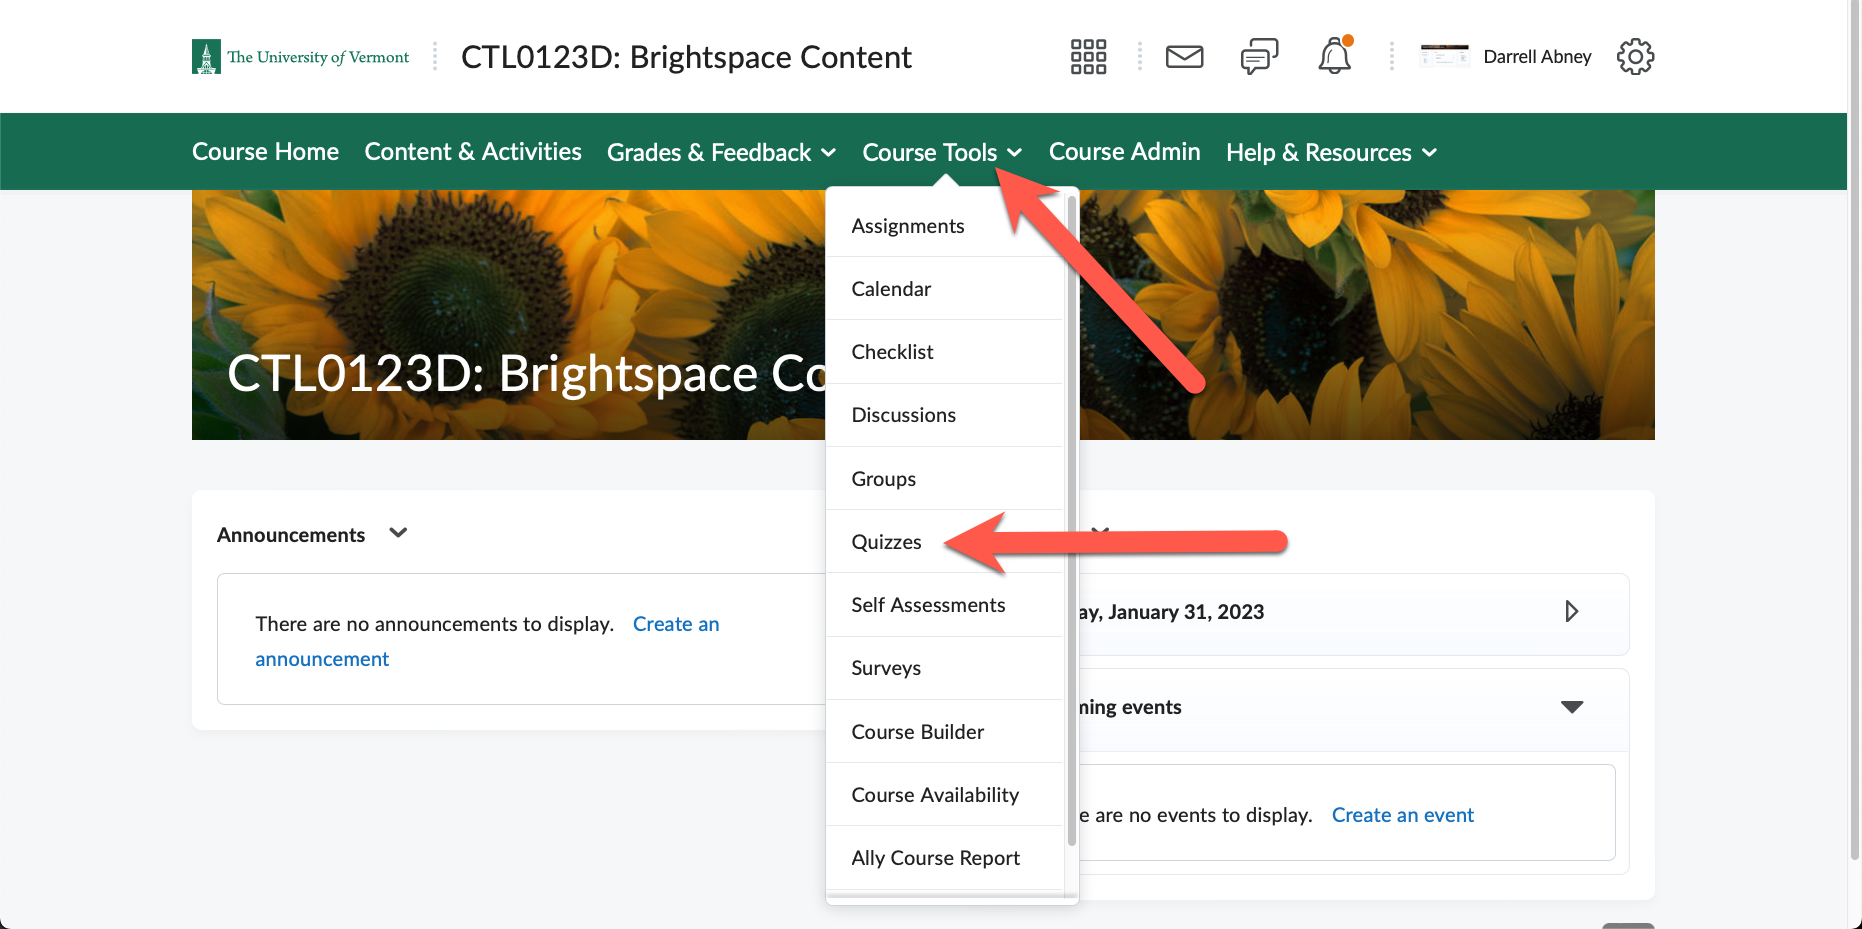
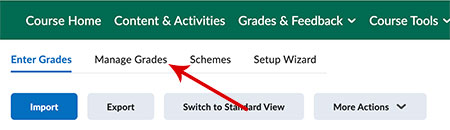
- On the green navbar, click Course Tools and select Quizzes.
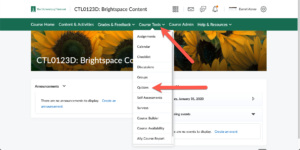 Click to enlarge ↑
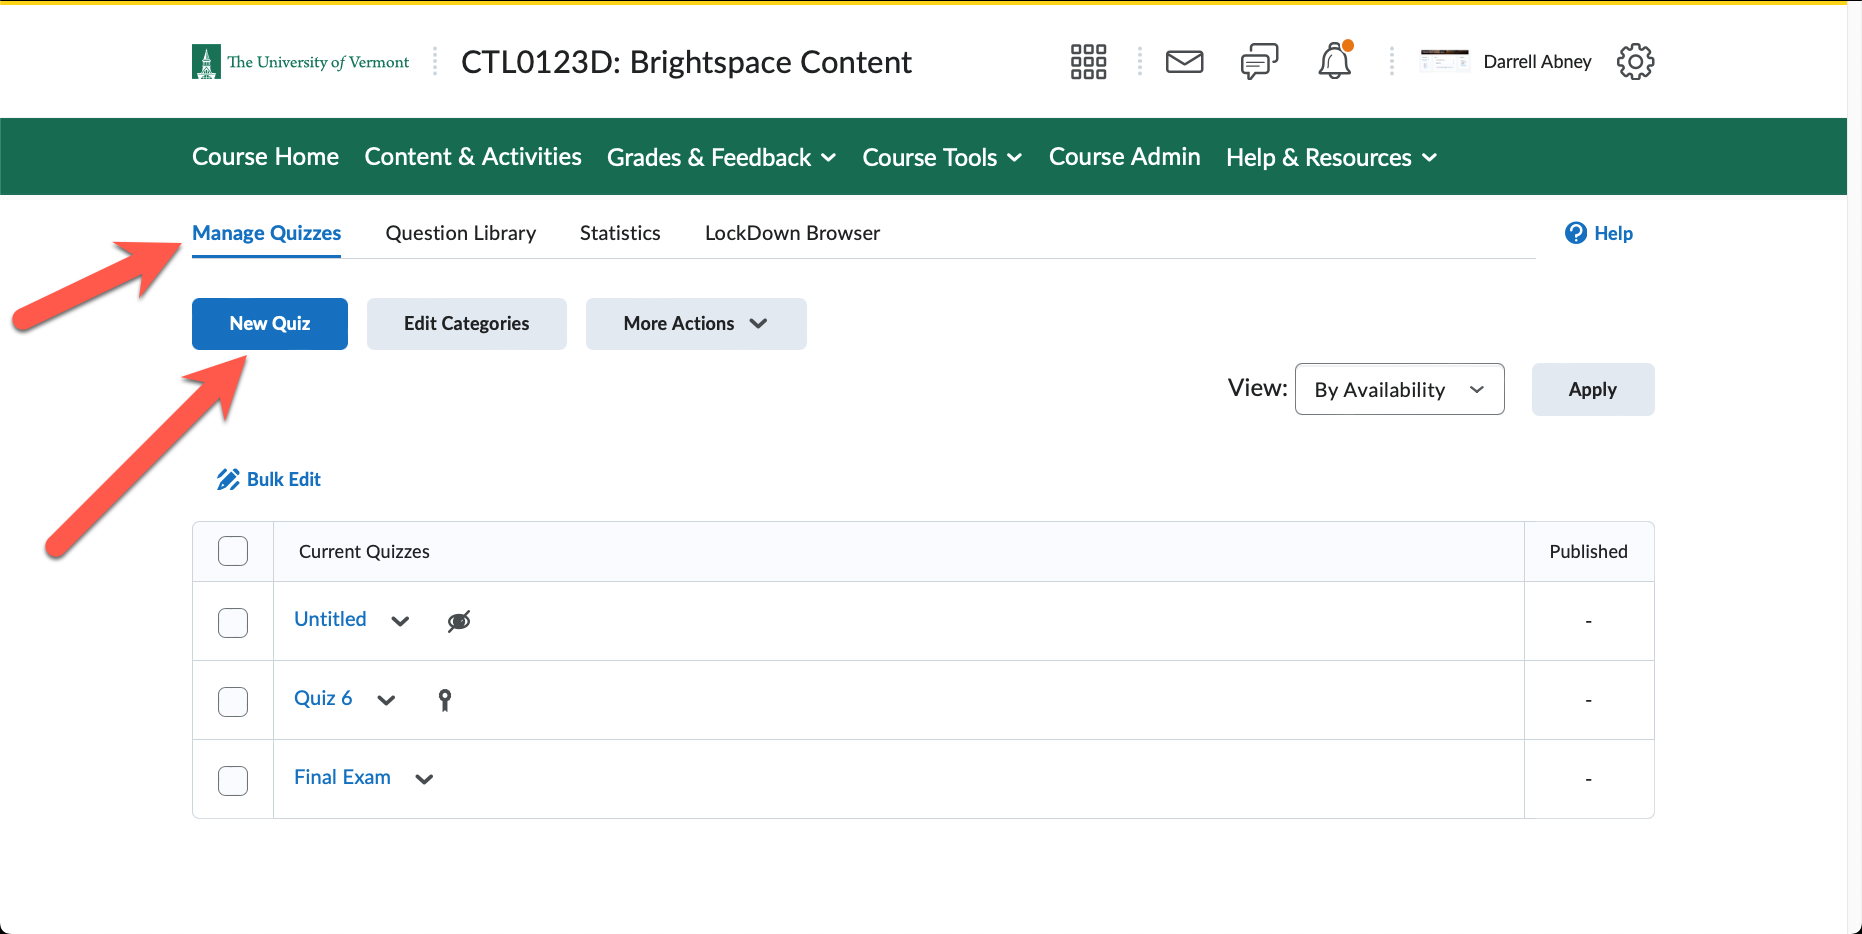
 - On the Manage Quizzes page, click New Quiz.
 Click to enlarge ↑
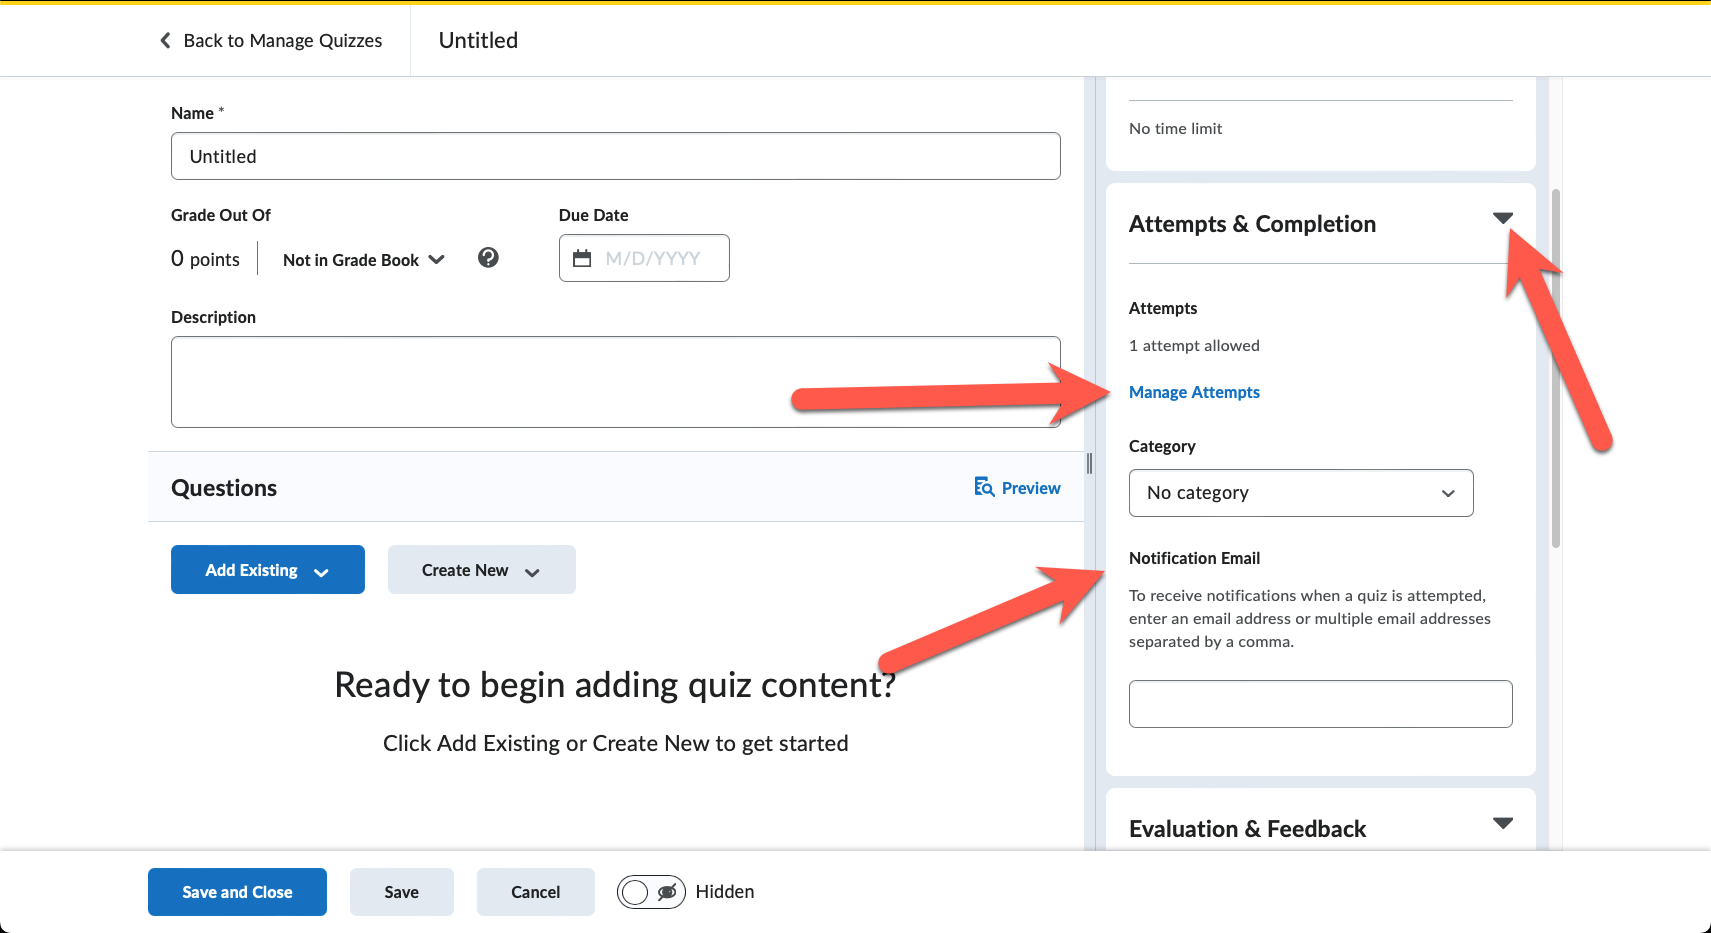
 - Enter the Name for your quiz.
- In the Grade Out Of section, you can choose to Edit or Link to Existing, which links the quiz to an existing grade item (column) in the Grade Book, or you can choose to Add to Grade Book to create a new grade item. (Since each question you’ll be adding has a point value, if you like, you can wait to enter the total points possible until you’ve added questions.)
- Important: Select the Due Date. Due dates throughout Brightspace are useful because they’re automatically entered on students’ calendars. Students can also download the Pulse app on their mobile devices and set their notifications to remind them about due dates.
- Entering a quiz description is optional.
 Click to enlarge ↑

These are the basic first steps to setting up Quizzes. To add questions and choose appropriate settings, see the next sections.
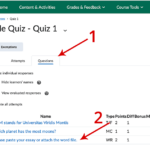
Create and Manage Questions
Create Questions in the Question Library
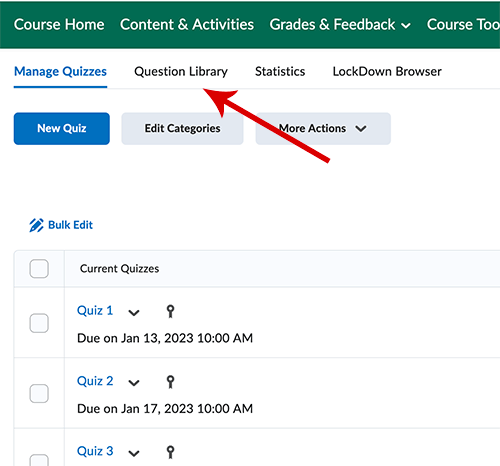
- Click on the Question Library tab at top of main quiz landing page.
- Click “New” and select Section. (Sections are essentially folders.) You may want sections about specific types of question topics.
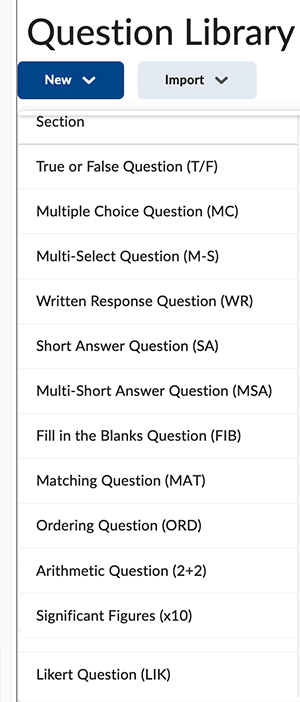
- Once the section is created, click on it to enter it, and click “New” to select the question type.
Available Question types
These question types link out to the D2L community definitions. If the page doesn’t load properly to display your question, just click refresh on your browser.
|
|
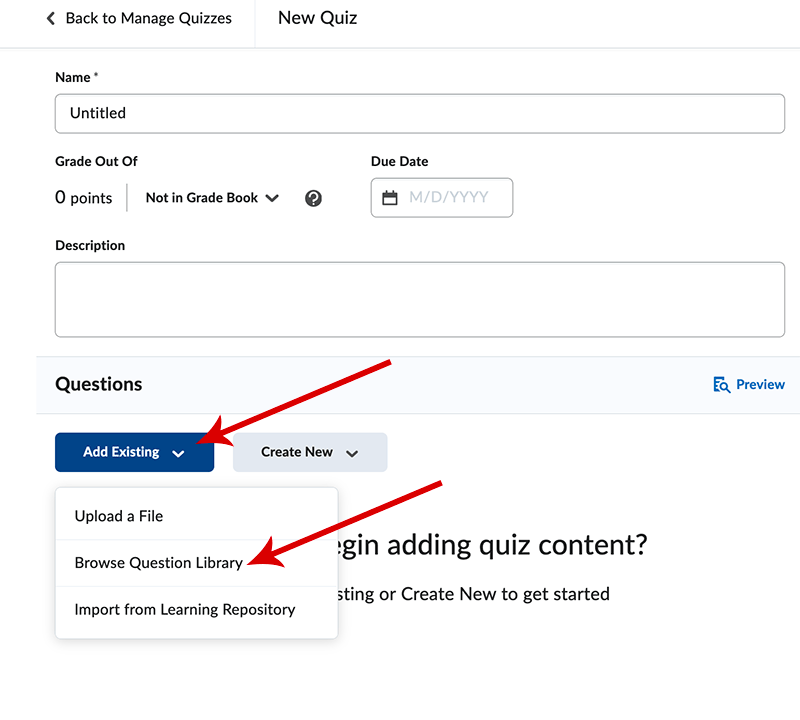
Back to the quiz building page, the options to add questions are “Add Existing” or “Create New” questions. If you’ve put questions in the Question Library, choose “Add Existing” to browse the library and select questions or sections.
Import Questions from Another Brightspace Course
To do this, we don’t work from within the Quizzes page, but instead go to the “Import/Export/Copy” area.

- Click the Gear icon on the top right of Brightspace and choose “Import/Export/Copy Components.”
- Choose “Copy Components from another Org Unit” (which means course) and click “Search for offering.”
- On the pop-up window, enter even just a partial title or a single word that’s in the course title. (It will only search courses you have access to) and click “Search”. When you’ve selected the course you want to copy from, click the “Add Selected” button at the bottom.
- Now that the course you’re copying from is listed under “Course to Copy,” click the “Select Component” button at the bottom of page.
- Scroll down to either Quizzes (to copy all questions in a quiz) or Question Library (to choose specific questions). You can click the (+) to “Expand All” and see what’s available to select. Check the questions or sections you want, and click continue.
- Click Finish. This may take a few minutes to complete. Once the copying is completed, you can find your copied elements either in the Quiz list or in the Question Library.
Move questions from existing Quizzes into the Question Library within same course
- On the Quiz page click the Question Library tab.
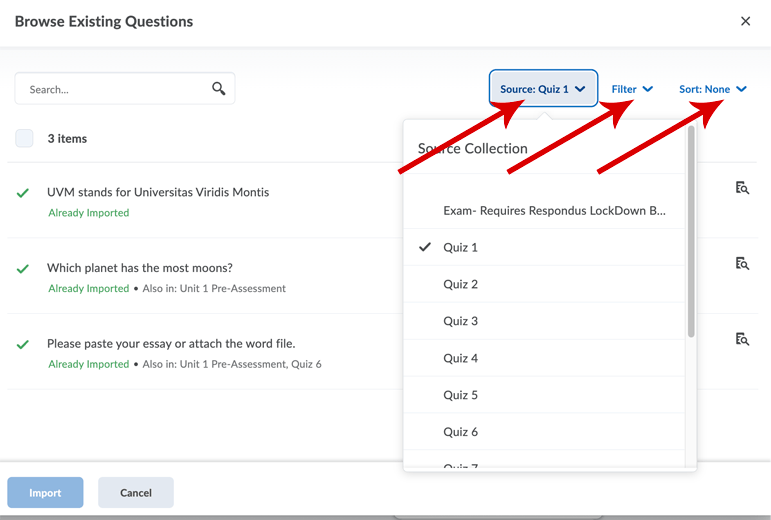
- Click Import and “Browse Existing Questions.”
- In the upper right, you should see one of your Quiz titles displayed. Click on it to view all quizzes. Choose the quiz you want to extract questions from and choose the questions or select all. You can, instead, click the question types, or choose other methods of filtering.
Convert Questions from a Word Document
There are two ways to generate Brightspace-ready questions from a Word Document. They are similar in that you have to format the questions in Word in a precise way. These two tools below have similar functions:
- Algonquin College Brightspace Test/Quiz Question Generator. Once you click on this converter, you can read the directions for formatting your questions, or view sample questions, and when you pasted in your own, as long as they are properly formatted, click “Generate Test Questions.” You will then get a file that can be Imported into your Question Library. (Note: If you originally built MC questions with the correct answers in random positions, great! If you did it differently, say, with all correct answers in the “A” position expecting the quiz/test tool itself will randomize them, be sure to spot check them. Once the questions are in Brightspace, drill down to edit a few MC questions just to make sure “Randomize answer order” is selected.)
- This other method of converting from word is a tool you can download from D2L (Brightspace’s parent company) and upload it to your courses. It ultimately functions the same way as the Algonquin converter, but there are more steps to set it up. Once you’ve set it up, it’s available to use within your course. Read instructions and download the zip file from the Quiz Question Converter page on the Brightspace Community site.
Extra-credit or bonus questions
Quizzes can include bonus (or extra-credit) questions, questions that won’t hurt the student’s overall score if they don’t get them correct, but can improve the student’s score if they do get them correct.
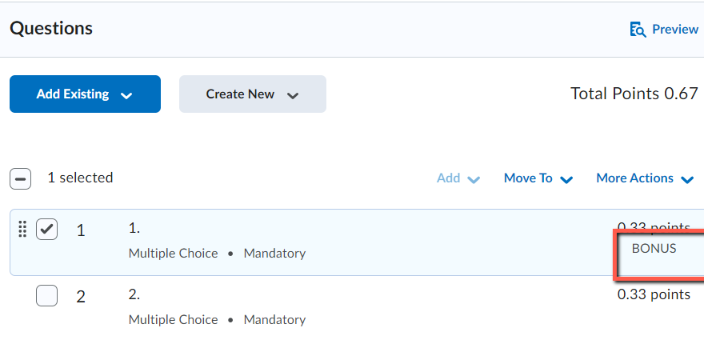
- Select the question in your existing quiz that you want to be for extra-credit (bonus).
- Click More Actions and select Toggle Bonus from the dropdown menu
- The text “BONUS” appears under the point value of the question
- De-select the question(s) when done.
- Click Save
Note: The questions that are ‘bonus’ will not calculate into your total points for the quiz.
For example, if it is a 40 question quiz and each question is worth 1 point, and you have two Bonus questions, your total point value will appear as 38 points instead of 40 points because students will be able to get 2 points extra credit for those two bonus questions. ie: 40/38.
Understand the Quiz Settings
Availability Date Ranges and Other Access Restrictions
The Availability Dates & Conditions section on the right controls when a quiz becomes available and unavailable. This is optional as you can leave it blank and the quiz will be available (as long as you have set it as visible, at the bottom of the quiz edit page – see section below).
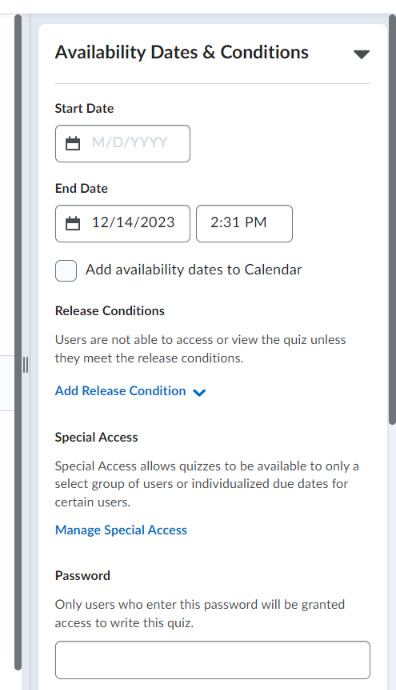
- Optional: Enter the Start Date and/or End Date. Set the opening date/time when students can take the quiz and the closing date/time when it will no longer be available. Students will see the quiz title, but the link to take the quiz will not appear. Bear in mind:
- If you check the box to include availability dates on their calendars, the start and end date will be listed in the calendar as distinct events.
- If you’ve provided a link to the quiz within a Content Module (see “Add a link to Quizzes in Content & Activities” below), students will see that link and its dates of availability will be indicated. However, it will not be clickable until the start date/time.
- Optional: Enter Release Conditions. This is where you can choose to have students complete something else before they get access to the quiz. Read more about release conditions on the Brightspace Community site or UVM’s Brightspace – Release Conditions article.
- Optional: Enter Special Access. This is where you can grant access to specific students for perhaps a one-time, different time period and with a different due date from the rest of the class. In the Special Access area, click Manage Special Access. Select your type of access and click Add Users to Special Access. Enter the special access Due Date and, if necessary, adjust the available Start Date and End Date. Scroll down to the Users section and select the student(s) who will have this special access. Click Save.
- Optional: Enter a Password.
Visibility: Hide a Quiz or Make it Visible
(Note: The visibility setting is not found in this exact section, but it’s included here for its relevance to making Quizzes available.)
Hidden/Visible overrides any other setting. So, if a quiz is set to be “Hidden,” students won’t be able to see it even after the availability date begins (see availability dates above). You can see if a quiz is hidden because an icon with an eye appears next to it. 
To hide or show a quiz, manually:
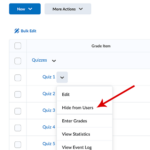
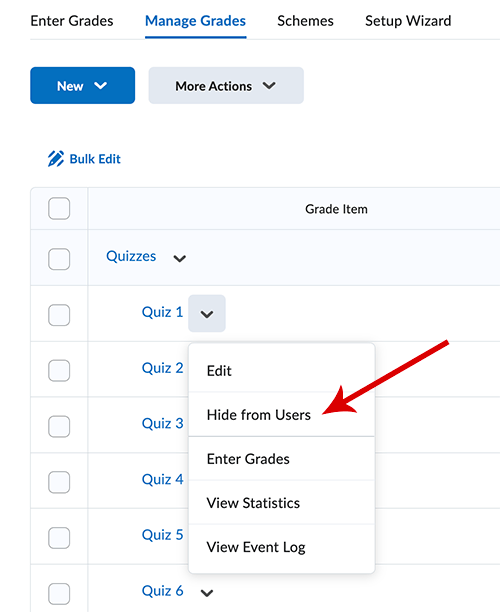
- On the Manage Quizzes page, click the down arrow next to the quiz title and choose “Hide from Users.” Then, to reveal it, the select the option to “Make Visible to Users
- Alternatively, when editing a quiz, you can toggle between “Hidden” and “Visible” at the bottom of the page near the Save button. You can also hide and reveal it where it’s linked in a Content Module.
Bear in mind that hiding is only controlled manually by you or a TA. You will have to manually set it to visible.
Timing & Display
In the Timing & Display area, select a timing option for the quiz:
- For an untimed quiz, uncheck “Set Time Limit”
- If you do want to “Set Time Limit” you have several options to select
- Enter the minutes
- Click “Timer Settings”
- Choose from the settings described and click “OK”
- Note: The grace period option no longer exists
- Choose Paging option – how many questions displayed per page
- Choose whether to shuffle the questions
- Display: Hints are optional additions you can add to questions
- Disabling Email, etc. is not effective as it only pertains to Brightspace tools
- Header and Footer are optional, but be aware that if you choose to display one question per page, the header and footer will appear on each page.
Attempts & Completion
In the Attempts & Completion drop-down, you can do any of the following:
- To change the number of attempts allowed, click Manage Attempts.
- Set how many attempts a learner can make on a quiz.
- To allow learners to only retake incorrect questions, select the On new attempts, only allow answers for previously incorrect questions checkbox. For more information on how this affects learners, refer to Retake incorrect questions in subsequent attempts
- If the number of attempts allowed is greater than 1, you must determine how the final grade is calculated. From the Overall Grade Calculation drop-down menu, select one of the following options:
- Highest Attempt – Only the attempt with the highest grade is used as the final grade.
- Lowest Attempt – Only the attempt with the lowest grade is used as the final grade.
- Average of all Attempts – The average of the grades on all attempts is calculated and used as the final grade.
- First Attempt – Only the grade on the first attempt is used as the final grade.
- Last Attempt – Only the grade on the last attempt is used as the final grade.
- If the number of attempts allowed is greater than 1, an optional feature under + Attempt Conditions allows you to determine minimum and/or maximum scores that must be achieved by the learner to obtain the additional attempts.
Note: If you enter a minimum score, then learners must achieve that set minimum score to receive the subsequent attempt. For example, if you only want learners who receive greater than 50% to receive a subsequent attempt, you can enter that value in the Min % field.
If you enter a maximum score, then learners can achieve up to that limit to receive subsequent attempts, but not greater than that limit. For example, if you only want learners who receive below 80% on the quiz to receive an additional attempt, you can enter that value in the Max % field.
- Category:
Categories of quizzes can be set up on the Quiz page so that you can organize them into related chunks. For instance, weekly quizzes could be one category and exams another. - Email Notifications
To receive notifications when a quiz is completed, enter your (or multiple) email addresses in the Notification Email box. Click to enlarge ↑
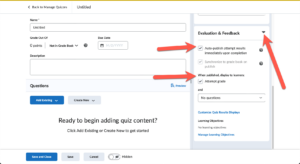
Evaluation & Feedback
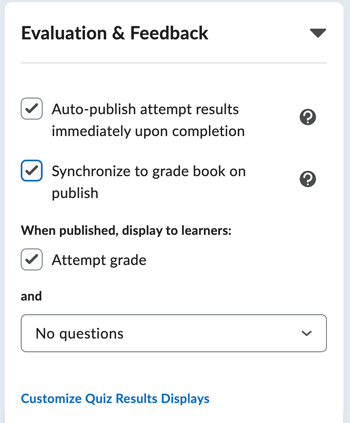
In the Evaluation & Feedback drop-down, do any of the following:
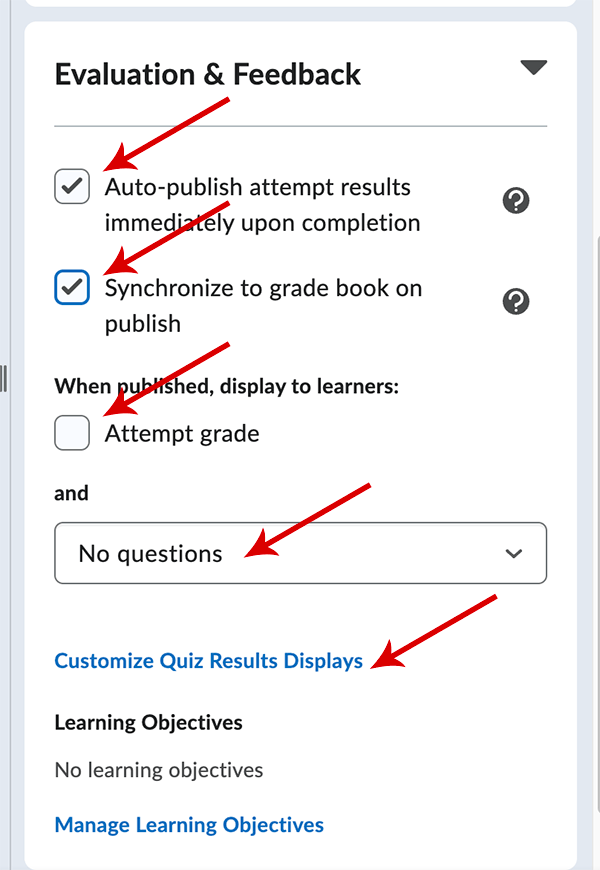
- To present quiz grades to students immediately, select the Auto-publish attempt results immediately upon completion checkbox. This setting must be turned on for grades to be automatically sent to the grade book and for the default submission view to be released to users when they complete an attempt. Do not select this if you have Written Response question types. (See alert box above.) You have the option to publish grades after the due date or other time you choose. See these options below.
- To have the quiz grades sent to the Grade Book when they are published, select the Synchronize to grade book on publish checkbox.
- To display your learners’ attempt grade and possible answers, under When published, display to learners, select the Attempt grade checkbox; and you can choose how you would like questions to be displayed after evaluation.
- To customize how your quiz results display, click Customize Quiz Results Displays. Again, see these different options below.
- To further customize what students see, and when, click Edit View or Additional View
 Click to enlarge ↑
For example: You wish students to see their score immediately after their attempt, but during class you would like students to be able to view all questions. Create an additional view for specific date and/or time period.

Set Accommodations
The good news is that you can set accommodations once, and they will persist for all quizzes (and exams) during the course. To do this:
- In the Course nav bar, click Grades & Feedback > Classlist.
- Scroll down to each student who has a testing accommodation (you’re notified by the Access Office) and click the down-arrow by their name.
- From the menu that appears, choose Edit Accommodations.
- Check the box to Modify Time Limit.
- Enter the multiplier of original time (usually 1.5).
- Click Save.
You will now see a new icon next to their name. Students who have this will see this icon, too, and when they click it, it will confirm that they’re being given time and a half.
Add a Quiz Link to Content & Activities
- From within the module, click the “Existing Activities” button.
- Scroll down to Quizzes and select the quiz to add.
Grading Quizzes
View Results and Grade Written Response Questions
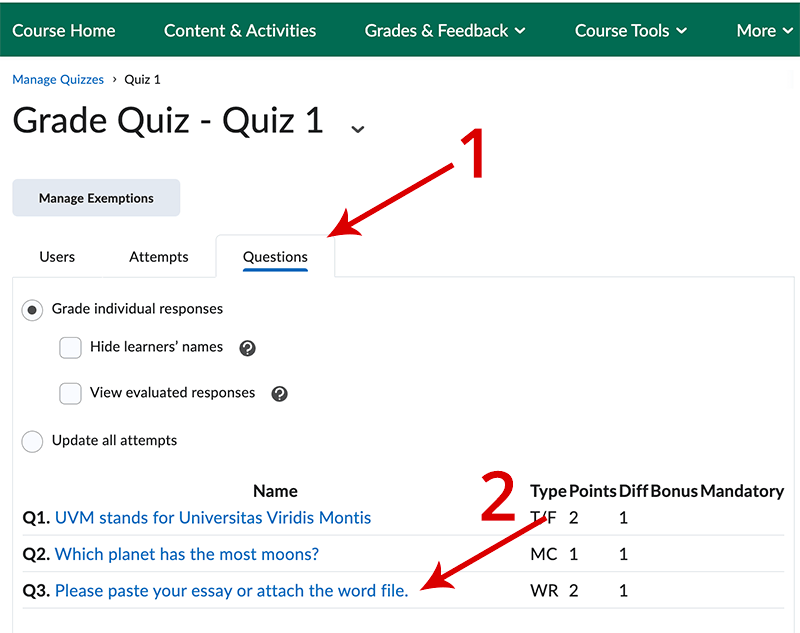
Most quiz question types are automatically graded by Brightspace. The exception to this is the Written Response question. There are a few ways to approach this, and here is one:
- Go to the Quizzes page.
- Click the small arrow next to the Quiz title.
- From the menu, choose Grade.
 Click to enlarge ↑
 - On the next page, click the “Question” Tab to isolate just the written response question(s)
- Click on the question to grade
- Enter a grade and feedback then click the arrows to go to the next student’s submission.
Correcting Quizzes or Resetting a Students’ Quiz Attempt
Resetting a Quiz to Not Taken
There might be an occasion where you want to remove a student’s quiz attempt so they can start fresh. These steps will remove their attempt entirely:
- Go to Course Tools > Quizzes.
- Click the dropdown menu next to the quiz title and select “Grade“.
- Select the student(s) and their attempts to reset.
- OR, if you want to reset everyone’s quiz to untaken, make sure everyone is displayed on a single page. At the bottom of the page, it may say “20 per page,” so if you have a larger class, choose a display number that will include all students.
- Once the entire roster is shown, select all students and attempts by choosing the top/left checkbox above the roster.
- Click “Reset” just above and confirm “Yes“
Correcting and Regrading a Quiz
When you discover that a question is incorrect you can simply eddit it if no one has taken the quiz yet. However, if some or all students have taken it, you’ll have to correct the question, regrade all quiz attempts, and then publish the updated grades.
Correcting questions after quiz has been taken by some or all students
If there are still students who haven’t taken the quiz, edit the question normally so these students will get the corrected version when they open the quiz. Note: This ONLY corrects it for future attempts.
- Go to Course Tools > Quizzes.
- Click the name of the quiz.
- Click on the question to edit. Make your change.
Update questions/grades on quizzes that have already been taken.
- Go to Course Tools > Quizzes.
- In the dropdown menu for the quiz, choose Grade.
- Click to view the Questions tab.
- Select “Update All Attempts.”
- Click on the question that has to be re-graded.
- This next part varies according to question type. For a multiple choice question (where the wrong answer was selected to be the correct one), you’ll essentially want to give points to students who chose the actual correct answer and eliminate points if they selected the erroneously-chosen “correct” answer. So,
- Give points to attempts with answer X [choose what is actually the correct answer] and enter the number of points they should have received for it.
- Save.
- Now, give to attempts with answer y [the incorrect answer which had been erroneously set as the correct one] and enter 0 points.
- Leave a comment explaining the correction in the comment field.
- Save.
- Each question type has slightly different options for making adjustments.
- Save and Go Back to Question.
- Grades should now be updated.
Choose what feedback students see (and when)
Consider the simplest setting, first
On the Quiz Edit page, under Evaluation and Feedback, there are 3 boxes you might choose to tick:
- Check “Auto-publish attempt results immediately upon completion” if you want students to see grades instantly upon submitting (and if you have no written response questions – see yellow warning box, below).
- Check “Synchronize to the grade book” if you want the grades to appear in the grade book. Keep in mind that even if you do choose this, students will see their scores if they open the quiz again, unless you refrain from publishing them (step 1).
- Attempt Grade should be checked in order for them to see their overall quiz grade, but then click the drop down arrow just below and decide whether they’ll see the questions, what they got right and/or other options.
These are the basic display settings for quiz results. If you want to customize them further, then review the various options, below.
Each scenario has custom settings
Students see questions, correct answers, and their score only after the due date
This option works well if you didn’t include Written Response questions, which need to be graded by the instructor and are initially scored as zero. For quizzes with Written Response questions see the option for showing the score after you’ve graded the attempts.
-
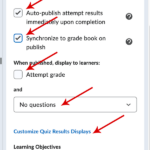
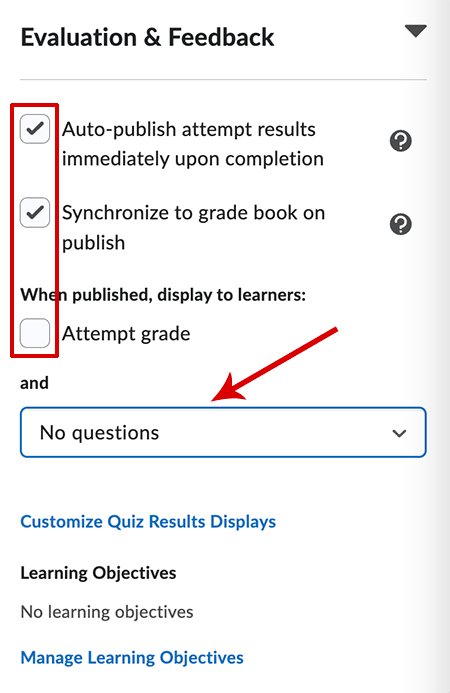
Select “Auto-publish attempt results immediately upon completion” - Select “Synchronize to grade book on publish” if you have associated the quiz with a Grade Book item
- Do not select “Attempt grade”
- Choose “No questions” in the dropdown menu
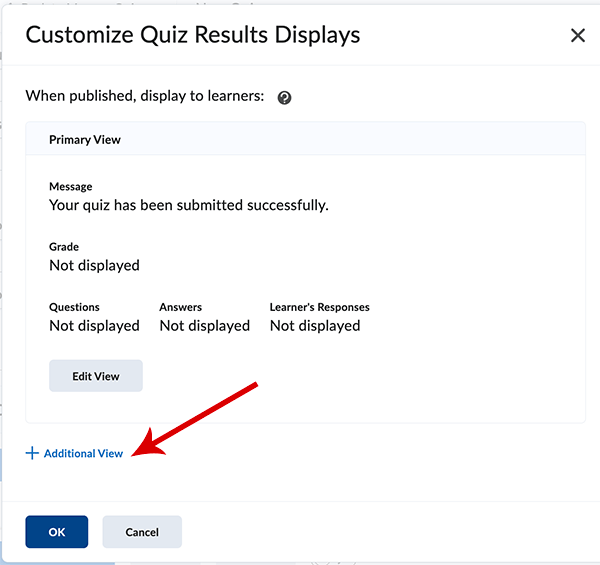
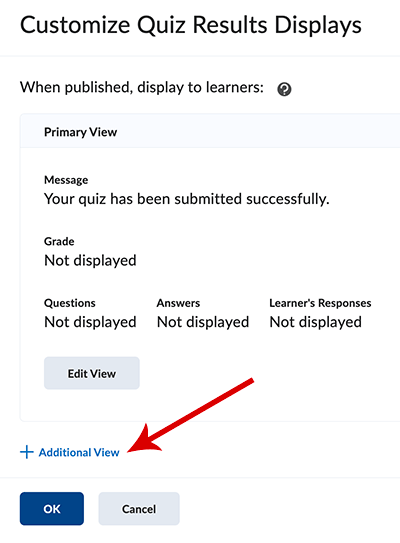
- Click on “Customize Quiz Results Display”
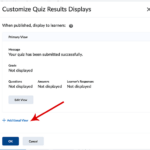
- On the next screen, click “+ Additional View.”
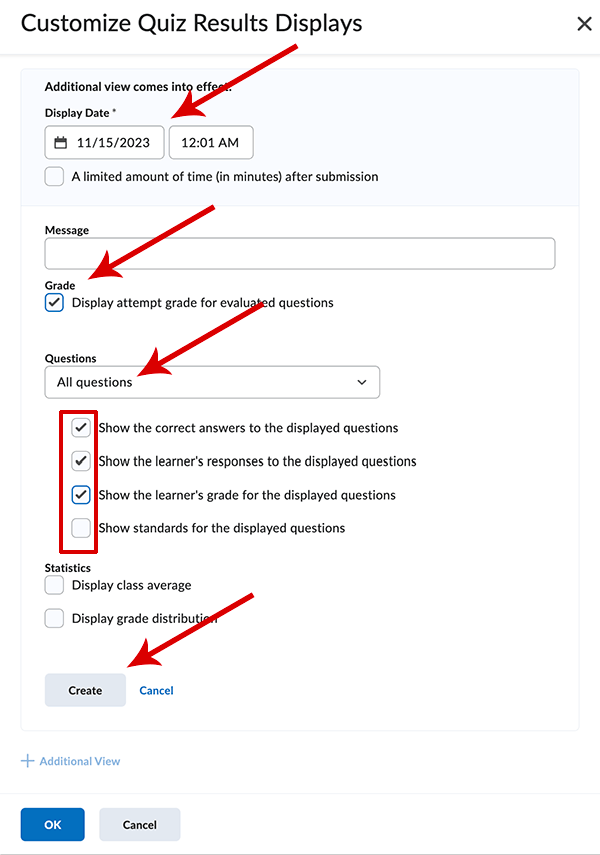
- Set the display date to your quiz due date.
- Select “Display attempt grade for evaluated questions.”
- Under Questions, open the dropdown menu and choose “All Questions.”
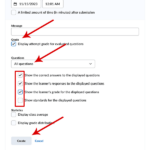
Select “Show correct answers to the displayed questions.”- Select “Show learner’s responses to the displayed questions” if you want students to see their responses and any feedback you included when you created the questions.
- Select “Show the learner’s grade for displayed questions” if you want students to see the points they earned for each question.
- Click Create and then Ok.
If you’ve set the scores to synchronize to the Grade Book:
- Go to Grades.
- Click on Manage Grades.
- Open the dropdown menu for the quiz item and choose Hide from Users. Note, when you’ve chosen to display quiz grades to student at a future date, they’ll be able to access them at that point in a few places (on the quiz page, in Class Progress, and in the Grade Book). Because you’ve hidden the Grade Book item (column), you’ll need to remember to unhide it .
 However, after the due date (or whatever date you designated), they will be able to see their score if they view their attempt from the Quizzes tool or Class Progress tool.
Students see questions, correct answers, and their score after you’ve graded the attempts
This option works well for quizzes with Written Response questions which must be graded by the instructor and are initially scored as zero upon completion.

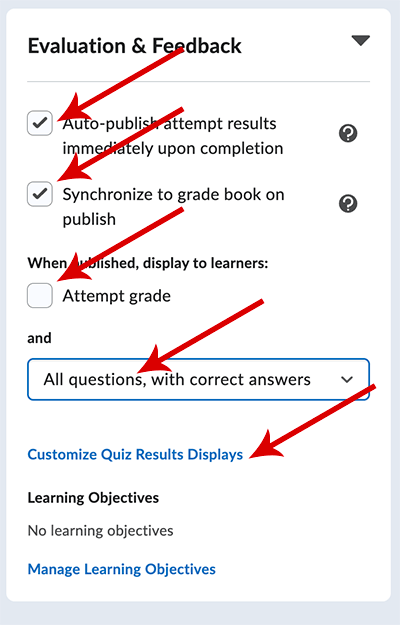
- Do not select “Auto-publish attempt results immediately upon completion.”
- Select “Synchronize to grade book on publish” if you have associated the quiz with a Grade Book item.
- Select “Attempt grade.”
- Choose “All questions, with correct answers” in the dropdown menu.
When to Publish?
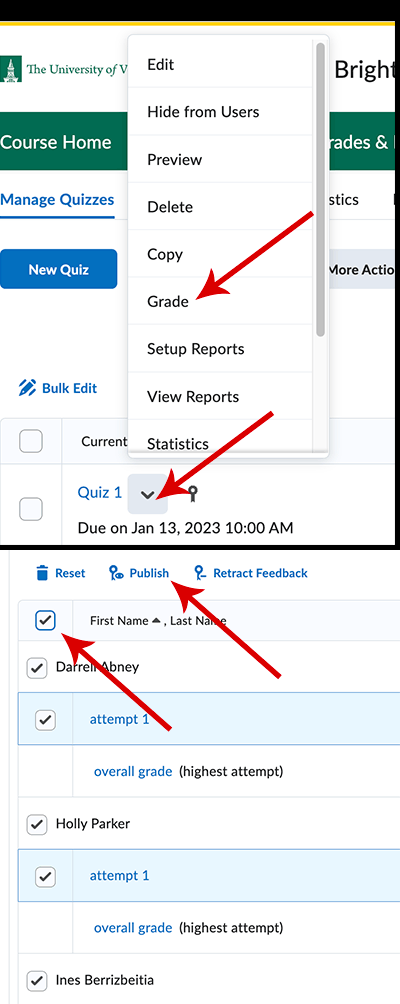 You can publish the scores as you grade each student or you can save the scores as drafts and, when you’ve completed grading, you can publish all grades (or selected). To publish, select all (click top box) or select specific attempts you want to publish, then click Publish at the top of the list. Once the attempts are published students will be able to see their score in the Grade Book and can click on Class Progress or go to the Quizzes page and click on the attempt to see the questions, etc.
Students see questions with correct answers and their score upon submission
This option works well for quizzes that do not include Written Response questions, which must be graded by the instructor and are initially scored as zero. For quizzes with Written Response questions, see the options for waiting to show the score until after you’ve graded the attempts.

- Select “Auto-publish attempt results immediately upon completion”
- Select “Synchronize to grade book on publish” if you have associated the quiz with a Grade Book item.
- Select “Attempt grade”
- Choose All questions, with answers in the dropdown menu
Students see questions with correct answers after they complete the quiz, but see their scores after quizzes are graded
This option works well for quizzes that include Written Response questions which must be graded by the instructor and are initially scored as zero.
In this example, you want students to be aware of the correct answers to auto-graded questions, but prevent confusion related to Written Response questions initially displaying a grade of 0.
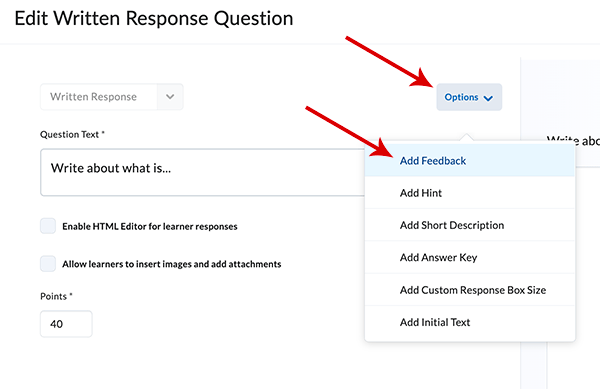 Upon completion, students will see both submitted and correct answers to auto-graded questions. For Written Response questions, there’ll be a message that says, “This question has not been graded.” (Note: Since there is no specific “correct answer” for Written Response questions, if you want to provide everyone with generic feedback for that question, while editing or creating the question, click Options, and Add feedback. See image.)
Clearly communicate to your students that they should click on “View feedback” beneath the Written Response question to see your feedback. Consider including a reminder about it message (see steps below). Note that making the scores visible to students requires an additional step once you’ve graded the quiz.
- Select “Auto-publish attempt results immediately upon completion.”
- Select “Synchronize to grade book on publish”.
- Do not select “Attempt grade.”
- Choose All questions, with correct answers in the dropdown menu.
- Click on Customize Quiz Results Display and Edit View for the Primary View.
- Modify the message students see upon submission to include a reminder to view the feedback.
- Leave “Show correct answers to the displayed questions” selected for students to see the correct answers.
- Deselect “Show learner’s responses to the displayed questions” if you don’t want students to see their responses; note that this will prevent students from seeing any feedback you included when you created the questions.
- Deselect “Show the learner’s grade for displayed questions” if you don’t want students to see the points they earned for each individual question.
- Click Update and then Ok to save.

Once you’ve set up the quiz, go to Grades, click on Manage Grades, and use the dropdown menu for the quiz item to hide it from student. Note that you’ll need to remember to unhide the Grade Book column for students to see their score in the Grade Book. To allow students to see their score from the Quiz tool, Go to the Quizzes page and edit the quiz. In the Evaluation & Feedback area, select “Attempt grade” after you’re done grading the quiz.
Students see their scores (but no questions) after the quiz is due
You can choose to allow students to see their scores only within the quiz tool or only from the Grade Book (or both). Note that allowing students to see their score in the Grade Book after the due date requires you to manually change its visibility at the time you want students to see it.
This option works well for quizzes that do not include Written Response questions, which must be graded by the instructor and are initially scored as zero. For quizzes with Written Response questions, see the options for waiting to show the score until after you’ve graded the attempts.
To show scores in the quiz tool only:
- Select “Auto-publish attempt results immediately upon completion.”
- Select “Synchronize to grade book on publish” if you’ve have associated the quiz with a Grade Book item
- Do not select “Attempt grade.”
- Choose “No questions” in the dropdown menu
- Click on “Customize Quiz Results Display” and add an Additional View
- Set the due date
- Select “Display attempt grade for evaluated questions”
- Choose “No Questions” in the dropdown menu
- Once you’ve set up the quiz, go to Grades, click on Manage Grades, and use the dropdown menu for the quiz item to hide it from students.
To show scores in the Grade Book only:
- Editing the Quiz, go to the Evaluation & Feedback area. Select “Auto-publish attempt results immediately upon completion.”
- Select “Synchronize to grade book on publish.”
- Do not select “Attempt grade.”
- Choose No questions in the dropdown menu.
- Once you’ve set up the quiz, go to Grades, click on Manage Grades, and use the dropdown menu for the quiz item to hide it from student. After the due date, you’ll need to unhide the Grade Book column.
To show scores in both the Quiz tool and Grade Book:
- Select “Auto-publish attempt results immediately upon completion.”
- Select “Synchronize to grade book on publish” if you’ve have associated the quiz with a Grade Book item.
- Do not select “Attempt grade.”
- Choose No questions in the dropdown menu.
- Click on Customize Quiz Results Display and add an Additional View.
- Set date to due date.
- Select “Display attempt grade for evaluated questions.”
- Choose No Questions in the dropdown menu.
- Once you’ve set up the quiz, go to Grades, click on Manage Grades, and use the dropdown menu for the quiz item to hide it from students. After the due date, you’ll need to unhide the Grade Book column.
Students see their score (but no questions) after you’ve graded the attempts
This option works well for quizzes with Written Response questions which must be graded by the instructor and are initially scored as zero upon completion. You can choose to allow students to see their scores from the quiz tool only, from the Grade Book only, or in both places.
To show scores in the quiz tool only:
- Do not select “Auto-publish attempt results immediately upon completion.”
- Select “Synchronize to grade book on publish” if you’ve have associated the quiz with a Grade Book item.
- Select “Attempt grade” (this will allow students to see their score only after you’ve published the scores).
- Choose No questions in the dropdown menu.
Once you’ve set up the quiz, go to Grades, click on Manage Grades, and use the dropdown menu for the quiz item to hide it from student. Publish the scores as you grade each student, or save the scores as drafts and publish them all (or only select students) once you’re done by selecting the attempts you want to publish and clicking on Publish at the top of the list. Once the attempts are published students will be able to see their score from the Quiz tool by clicking on their attempt in the quizzes list. You’ll need to unhide the Grade Book column for students to see their score in the Grade Book.
To show scores in the Grade Book only:
- Select “Auto-publish attempt results immediately upon completion.”
- Select “Synchronize to grade book on publish.”
- Do not select “Attempt grade.”
- Choose No questions in the dropdown menu.
Once you’ve set up the quiz, go to Grades, click on Manage Grades, and use the dropdown menu for the quiz item to hide it from student. After you’ve graded the quiz, unhide the Grade Book column.
To show scores in both the quiz tool and Grade Book:
- Do not select “Auto-publish attempt results immediately upon completion.”
- Select “Synchronize to grade book on publish”
- Select “Attempt grade”
- Choose No questions in the dropdown menu.
Once you’ve set up the quiz, go to Grades, click on Manage Grades, and use the dropdown menu for the quiz item to hide it from student. After you’ve graded the quiz, publish the scores and unhide the Grade Book column.