1. Home
  2. Backup and Storage
  3. Accessing Network Folders
  1. Home
  2. Servers and Data
  3. Accessing Network Folders

Accessing Network Folders

UVM Enterprise Technology Services maintains several services for file storage. Among these are the Zoo Unix environment, available to students and employees, as well as a Windows Shared Drive service hosted on Windows servers and integrated with the CAMPUS Active Directory domain. There are several other more specialized storage services, such as Netfiles Research Storage and UVM’s Silk Web Hosting. UVM also offers up to a terabyte of OneDrive cloud storage to active students, staff, and faculty, as well as 100GB to retired staff and faculty.

Not sure how to store your data?

The right solution depends on what kind of data you’re storing and how it is used. If you’re not sure which solution to use, submit a help request!

Access from the Web 

WebFiles

Ad blockers may prevent viewing of files

Consult your ad blocker’s documentation on how to “allowlist” or “trust” the webfiles.uvm.edu page, temporarily disable your ad blocker, or switch to another browser that doesn’t have an ad blocker installed.

Webfiles is available to current students, faculty, and staff, and allows you to access your MyDocs, Shared, and Zoo files from the web. Webfiles requires Duo, but a VPN connection is not required.

  1. Visit https://webfiles.uvm.edu, and sign in with your NetID and password.
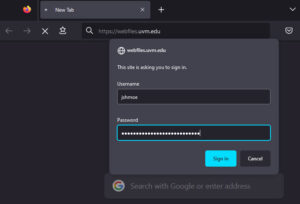
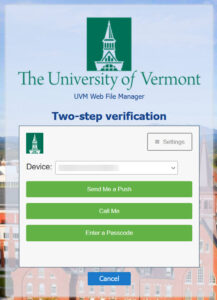
  2. Proceed through the Duo MFA prompt.
  3. Your network folders will appear in the left pane of the browser.

Shared Drive

Windows 10

Shared Drive Folder Access is Provisioned

Your supervisor can email helpline@uvm.edu to request access to departmental shared folders on your behalf.

Mapping Network Folders Requires VPN

You must use the Cisco AnyConnect VPN Client when mapping Network Folders from Off-Campus.

  1. Press the  + E keys on your keyboard to open the File Explorer.
  2. Select This PC and go to the Computer tab, and then select Map network drive from the toolbar that appears.
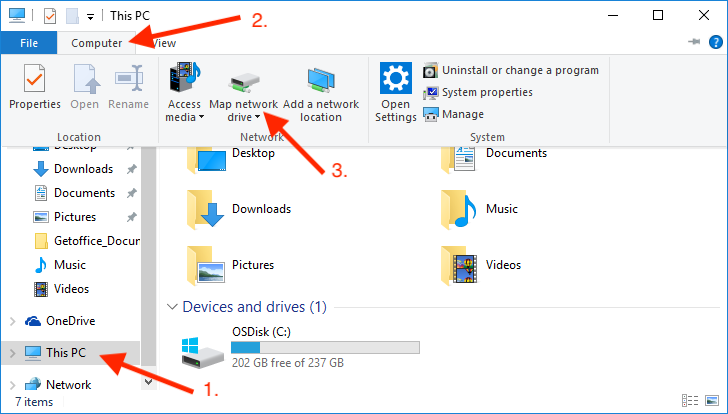
  3. Select an available drive letter from the drop-down menu, and then enter the following folder address: \\files.uvm.edu\shared
  4. Make sure that both “Reconnect at sign-in” and “Connect using different credentials” are checked, and then click Finish to bring up a prompt to enter your credentials.
  5. You’ll be prompted for your credentials – pay special attention to the username format, being sure to include CAMPUS\ before your NetID.
      • Username: CAMPUS\netid
        Password: Your NetID password
  6. After authenticating, your shared folders will appear in the File Explorer.

Windows 11

Shared Drive Folder Access is Provisioned

Your supervisor can email helpline@uvm.edu to request access to departmental shared folders on your behalf.

Mapping Network Folders Requires VPN

You must use the Cisco AnyConnect VPN Client when mapping Network Folders from Off-Campus.

  1. Press the  + E keys on your keyboard to open the File Explorer
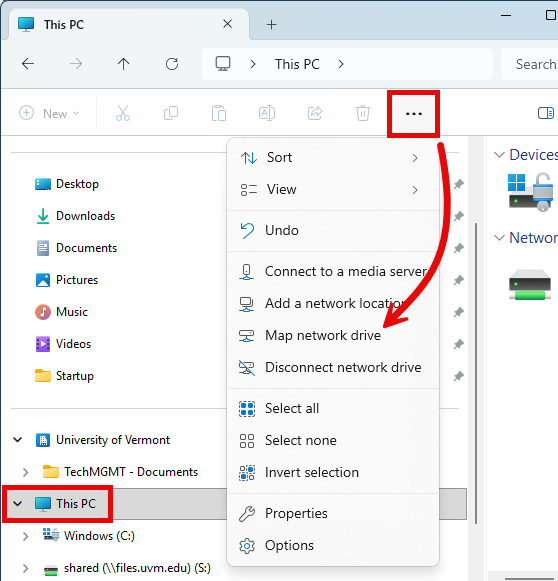
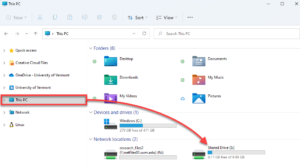
  2. Select This PC on the left side of the window.
  3. Click the three dots on the toolbar to view more options, and then select Map network drive.
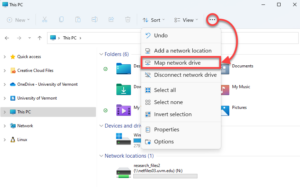
  4. Select an available drive letter from the drop-down menu, and then enter the following folder address: \\files.uvm.edu\shared
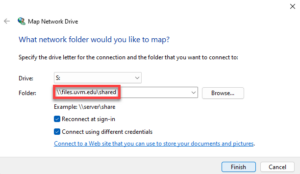
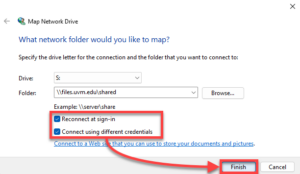
  5. Make sure that both “Reconnect at sign-in” and “Connect using different credentials” are checked, and then click Finish to bring up a prompt to enter your credentials.
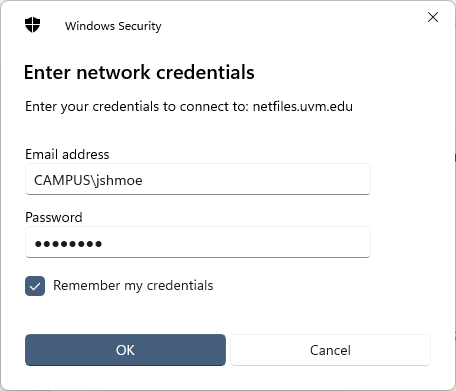
  6. Enter your NetID and password, check the box labeled Remember my credentials, and click OK.
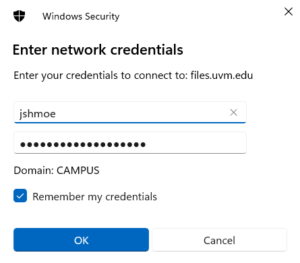
    May require more specific credentials

    If “Domain: CAMPUS” does not appear in this window, add “CAMPUS\” before your NetID

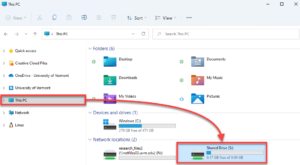
  7. You should now see Shared Drive under Network Locations in This PC.
macOS

Connecting to a Network Folder Requires VPN

You must use the Cisco AnyConnect VPN Client when mapping Network Folders from Off-Campus.

Shared Drive Folder Access is Provisioned

Your supervisor can email helpline@uvm.edu to request access to departmental shared folders on your behalf.

  1. Open Finder from the dock.
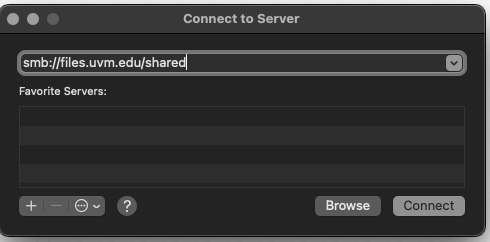
  2. Click Go in the menu bar at the top of the screen, and then select Connect to Server.
  3. Enter the Shared drive server address: smb://files.uvm.edu/shared and click Connect.
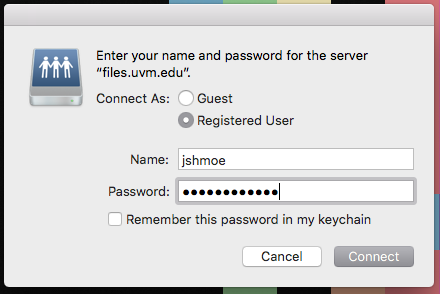
  4. Enter your UVM NetID and password, and then click Connect.
    Unable to authenticate?

    If your credentials aren’t working, try adding “campus\” before your NetID.

  5. Upon entering your credentials, you should have access to your network folder.

Linux

We’re unable to provide distribution-specific guides due to the considerable variation of desktop environments and package management between Linux distributions.

Please use the server path below as a reference for connecting your Linux machine to your desired network folder.

Shared Drive

cifs://files.uvm.edu/shared

MyDocs/Windows Home Folder

Windows home folders are being migrated to UVM OneDrive

You should receive an email prior to migration. After your move is complete, your MyDocs files will be accessible from Microsoft OneDrive.

Please reach out to the UVM Tech Team if you have any questions.

Windows 10

Mapping Network Folders Requires VPN

You must use the Cisco AnyConnect VPN Client when mapping Network Folders from Off-Campus.

Access to MyDocs is provisioned for current UVM employees.

  1. Press the  + E keys on your keyboard to open the File Explorer.
  2. Select This PC and go to the Computer tab, and then select Map network drive from the toolbar that appears.
  3. Select an available drive letter from the drop-down menu. Enter the Folder address \\files.uvm.edu\home\your_netid
    • Make sure that both “Reconnect at sign-in” and “Connect using different credentials” are checked. Then click the Finish button
  4. You’ll be prompted for your credentials – pay special attention to the username format, being sure to include CAMPUS\ before your NetID.
    • Username: CAMPUS\netid
      Password: Your NetID password
  5. After authenticating, your MyDocs folder will appear in the File Explorer.

macOS

Connecting to a Network Folder Requires VPN

You must use the Cisco AnyConnect VPN Client when mapping Network Folders from Off-Campus.

Access to MyDocs is provisioned for current UVM employees.

  1. Open Finder from the dock.
  2. Click Go in the menu bar at the top of the screen, and then select Connect to Server.
  3. Enter the MyDocs server address: smb://files.uvm.edu/home/your_netid then click Connect.

  4. Enter your UVM NetID and password, and then click Connect.
    Unable to authenticate?

    If your credentials aren’t working, try adding “campus\” before your NetID.

  5. Upon entering your credentials, you should have access to your network folder.

Linux

We’re unable to provide distribution-specific guides due to the considerable variation of desktop environments and package management between Linux distributions.

Please use the server path below as a reference for connecting your Linux machine to your desired network folder.

MyDocs

cifs://files.uvm.edu/home/your_netid

Netfiles

Windows 10

Mapping Network Folders Requires VPN

You must use the Cisco AnyConnect VPN Client when mapping Network Folders from Off-Campus.

  1. Press the  + E keys on your keyboard to open the File Explorer.
  2. Select This PC and go to the Computer tab, and then select Map network drive from the toolbar that appears.
  3. Select an available drive letter from the drop-down menu, and then enter \\name-of-server\name-of-share for the Folder address. Enter the address of your NetFiles share.
    Not sure what to enter for a server or share name?

    You can view any shares you manage and see their server locations at research-storage.uvm.edu. If you need to connect to a share managed by somebody else, you can ask that person for the server and share name.

  4. Make sure that both “Reconnect at sign-in” and “Connect using different credentials” are checked, and then click Finish to bring up a prompt to enter your credentials.Check both boxes and click Finish.
  5. Enter your NetID and password, check the box labeled Remember my credentials, and click OK.Enter your credentials to connect to NetFiles.
    May require more specific credentials

    If “Domain: CAMPUS” does not appear in this window, add “CAMPUS\” before your NetID.

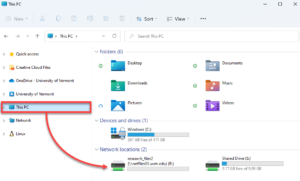
  6. You should now see the share under Network Locations in This PC.

Windows 11

Mapping Network Folders Requires VPN

You must use the Cisco AnyConnect VPN Client when mapping Network Folders from Off-Campus.

  1. Press the  + E keys on your keyboard to open the File Explorer.
  2. Select This PC on the left side of the window.
  3. Click the three dots on the toolbar to view more options, and then select Map network drive.Click the three dots and then Map Network Drive.
  4. Select an available drive letter from the drop-down menu, and then enter \\name-of-server\name-of-share for the Folder address. Enter the address of your NetFiles share.
    Not sure what to enter for a server or share name?

    You can view any shares you manage and see their server locations at research-storage.uvm.edu. If you need to connect to a share managed by somebody else, you can ask that person for the server and share name.

  5. Make sure that both “Reconnect at sign-in” and “Connect using different credentials” are checked, and then click Finish to bring up a prompt to enter your credentials.Check both boxes and click Finish.
  6. Enter your NetID and password, check the box labeled Remember my credentials, and click OK.Enter your credentials to connect to NetFiles.
    May require more specific credentials

    If “Domain: CAMPUS” does not appear in this window, add “CAMPUS\” before your NetID.

  7. You should now see the share under Network Locations in This PC.

macOS

Connecting to a Network Folder Requires VPN

You must use the Cisco AnyConnect VPN Client when mapping Network Folders from Off-Campus.

  1. Open Finder from the dock.
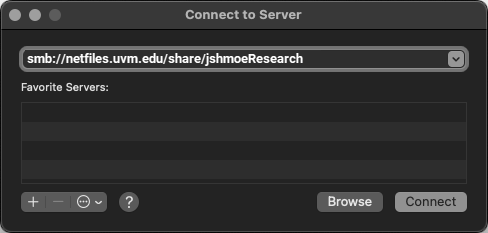
  2. Click Go in the menu bar at the top of the screen, and then select Connect to Server.
  3. Enter the Netfiles share address as smb://name_of_server/name_of_share and then click Connect.
    Not sure what to enter for a server or share name?

    You can view any shares you manage and see their server locations at research-storage.uvm.edu. If you need to connect to a share managed by somebody else, you can ask that person for the server and share name.

  4. Enter your UVM NetID and password, and then click Connect.

    Unable to authenticate?

    If your credentials aren’t working, try adding “campus\” before your NetID.

  5. Upon entering your credentials, you should have access to your network folder.

Linux

We’re unable to provide distribution-specific guides due to the considerable variation of desktop environments and package management between Linux distributions.

Please use the server path below as a reference for connecting your Linux machine to your desired network folder.

Netfiles

cifs://name_of_server/name_of_share

Not sure what to enter for a server or share name?

You can view any shares you manage and see their server locations at research-storage.uvm.edu. If you need to connect to a share managed by somebody else, you can ask that person for the server and share name.

VACC

If you have a VACC account, Netfiles shares are now automatically mounted on it at /netfiles/sharename. If you are unable to access your Netfiles share from the VACC please contact vacc@uvm.edu.

Zoo

Windows 10

Mapping Network Folders Requires VPN

You must use the Cisco AnyConnect VPN Client when mapping Network Folders from Off-Campus.

  1. Press the  + E keys on your keyboard to open the File Explorer.
  2. Select This PC and go to the Computer tab, and then select Map network drive from the toolbar that appears.
  3. Select an available drive letter from the drop-down menu, and then enter \\zoofiles.uvm.edu\your_netid as the Folder address.
    • Make sure that both “Reconnect at sign-in” and “Connect using different credentials” are checked. Then click the Finish button
  4. You’ll be prompted for your credentials – pay special attention to the username format, being sure to include CAMPUS\ before your NetID.
    • Username: CAMPUS\netid
      Password: Your NetID password
  5. After authenticating, your Zoo folder will appear in the File Explorer.

Windows 11

Mapping Network Folders Requires VPN

You must use the Cisco AnyConnect VPN Client when mapping Network Folders from Off-Campus.

  1. Press the  + E keys on your keyboard to open the File Explorer.
  2. Select This PC on the left side of the window.
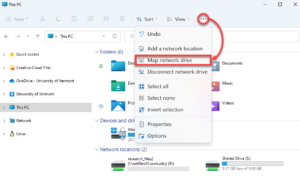
  3. Click the three dots on the toolbar to view more options, and then select Map network drive.
  4. Select an available drive letter from the drop-down menu, and then enter the following folder address, substituting in your NetID: \\zoofiles.uvm.edu\your_netid
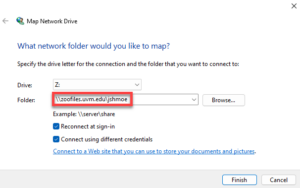
  5. Make sure that both “Reconnect at sign-in” and “Connect using different credentials” are checked, and then click Finish to bring up a prompt to enter your credentials.
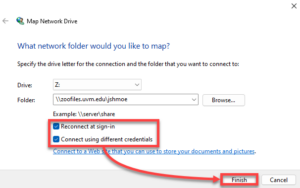
  6. Enter your NetID and password, check the box labeled Remember my credentials, and click OK.
    May require more specific credentials

    If “Domain: CAMPUS” does not appear in this window, add “CAMPUS\” before your NetID

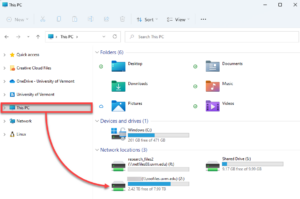
  7. You should now see your Zoo Folder under Network Locations in This PC.
macOS

Connecting to a Network Folder Requires VPN

You must use the Cisco AnyConnect VPN Client when mapping Network Folders from Off-Campus.

  1. Open Finder from the dock.
  2. Click Go in the menu bar at the top of the screen, and then select Connect to Server.
  3. Enter the Zoo server address: smb://zoofiles.uvm.edu/your_netid then click Connect.
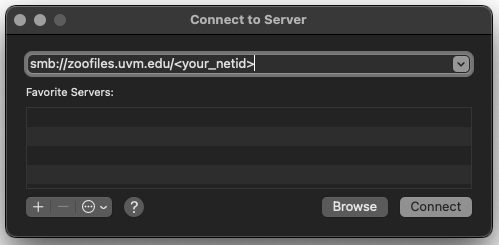
  4. Enter your UVM NetID and password, and then click Connect.
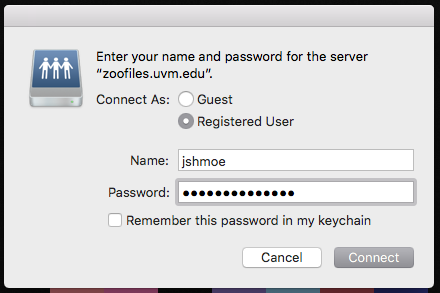
    Unable to authenticate?

    If your credentials aren’t working, try adding “campus\” before your NetID.

  5. Upon entering your credentials, you should have access to your network folder.

Linux

We’re unable to provide distribution-specific guides due to the considerable variation of desktop environments and package management between Linux distributions.

Please use the server path below as a reference for connecting your Linux machine to your desired network folder.

Zoo

cifs://zoofiles.uvm.edu/your_netid

Zoo via FileZilla (sftp, cross-platform)

Duo MFA is required for off-campus access to Zoo

Click here for instructions on adding a Duo MFA device.

  1. If you don’t yet have FileZilla, download it from software.uvm.edu and install it.
  2. Launch the FileZilla application.
  3. Click File in the top left corner, and then select Site Manager.
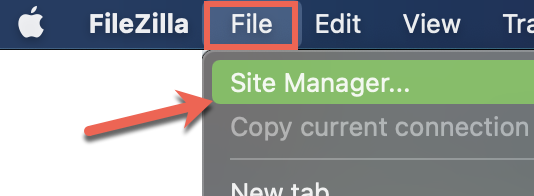
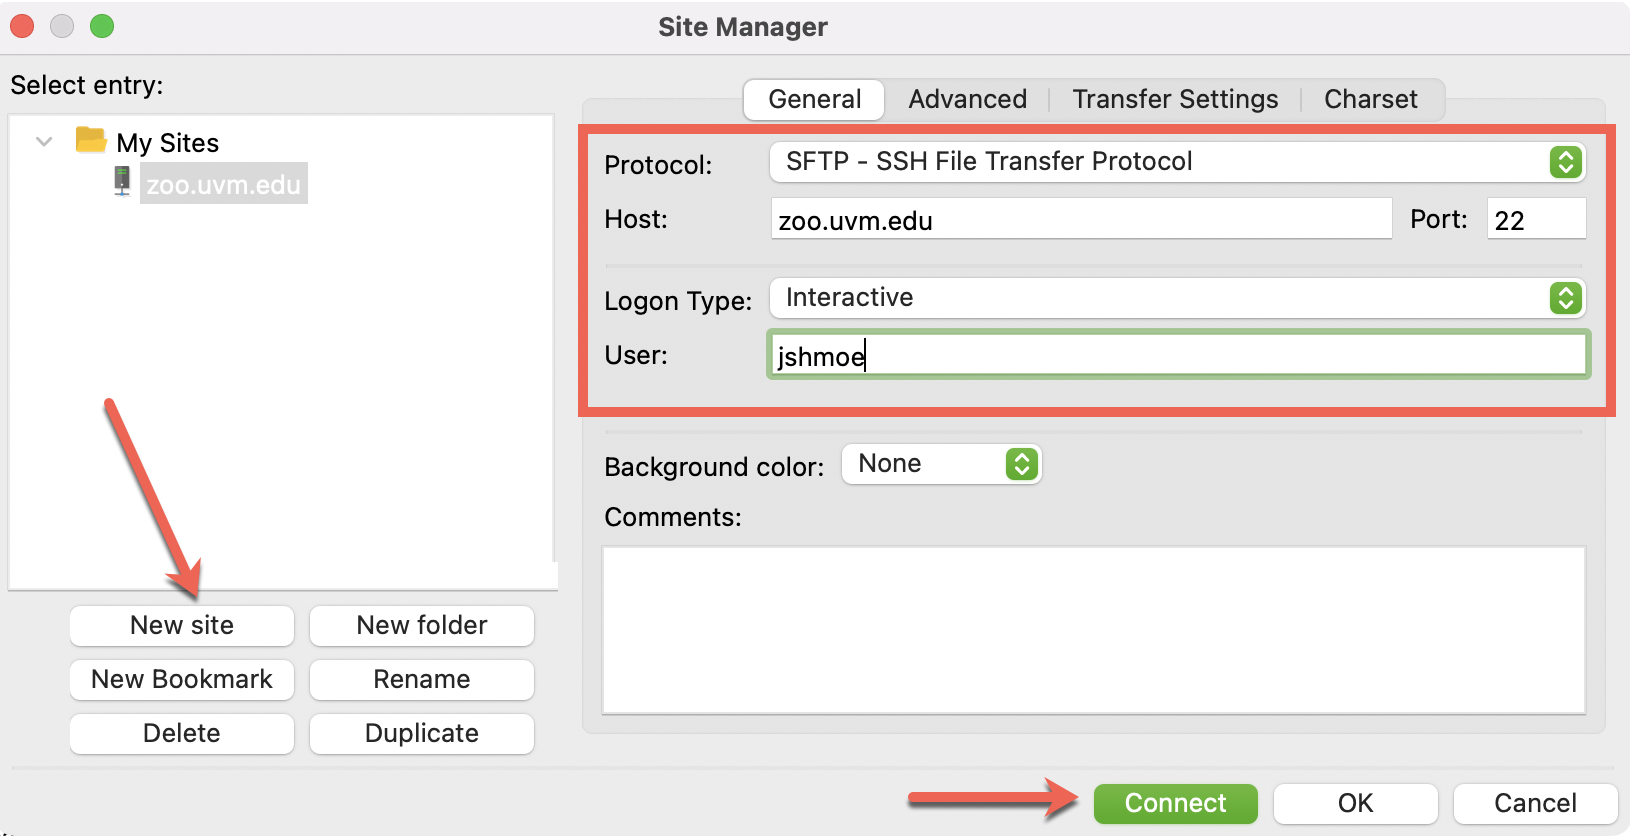
  4. Create a New Site, enter the following additional details under the General tab, and then click Connect.
    Protocol: SFTP
    Host: zoo.uvm.edu
    Port: 22
    Logon Type: Interactive
    User name: Your NetID
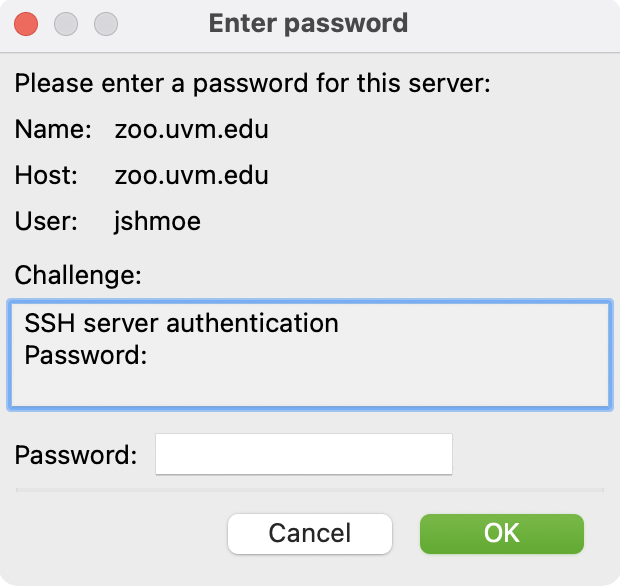
  5. Enter your NetID password when prompted and click OK.
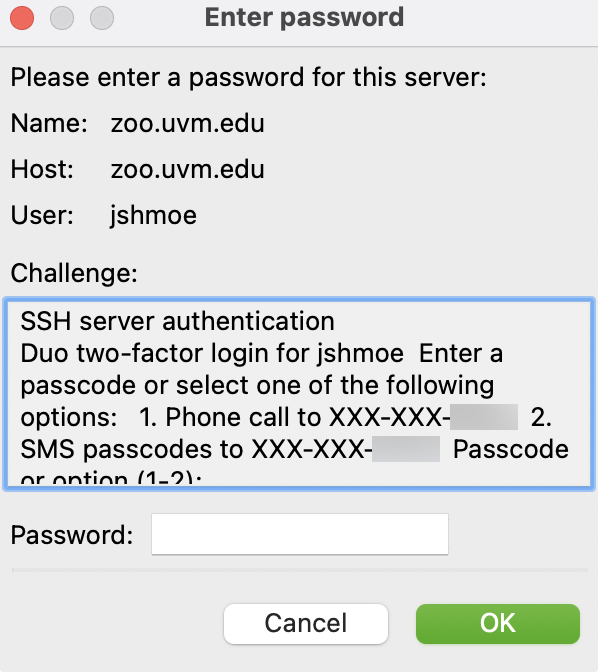
  6. Enter either a generated code or the corresponding number to the Duo device you wish to use, and then click OK.
Zoo via Fetch (sftp, macOS)

If Fetch is not installed on your machine, you can download it from the UVM Software page.

  1. Launch the Fetch application.
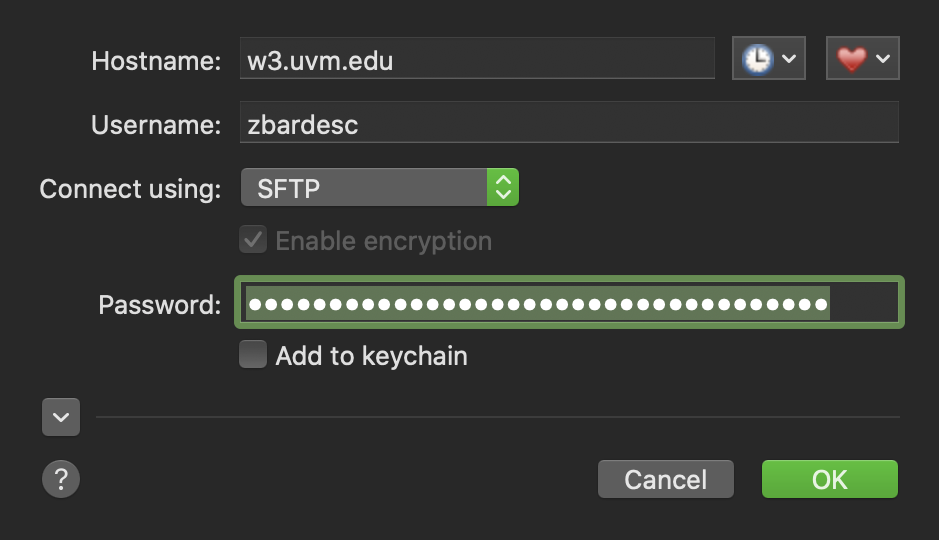
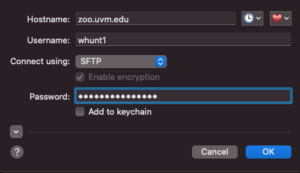
  2. Enter the following connection settings:
    Hostname: zoo.uvm.edu
    Username: your NetID
    Connect using: SFTP
    Password: your NetID password
  3. Enter either an existing Duo code OR a number representing your desired method of multifactor authentication, and then click OK.
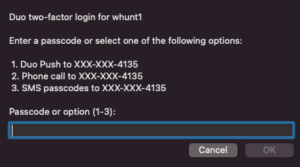
  4. Complete the Duo authentication prompt matching your entry above.

Silk

May require Duo if off-campus

If you try to log in to Silk using a password while off-campus, you will need to use Duo multifactor authentication to get in.

Silk via FileZilla (sftp, cross-platform)

  1. If you don’t yet have FileZilla, download it from software.uvm.edu and install it.
  2. Launch the FileZilla application.
  3. Enter the connection settings:
    Host name: w3.uvm.edu
    User name: your NetID
    Password: your NetID password
    Port number: 22
  4. Click Quickconnect.

Silk via Fetch (sftp, macOS)

If Fetch is not installed on your machine, you can download it from the UVM Software page.

  1. Launch the Fetch application.
  2. Enter the following connection settings:
    Hostname: w3.uvm.edu
    Username: your NetID
    Connect using: SFTP
    Password: your NetID password
  3. Click Ok.

Disconnecting a Network Drive

Windows 11

  1. Press the  + E keys on your keyboard to open the File Explorer.
  2. Click This PC on the left side of the window, and then select the drive you would like to disconnect.
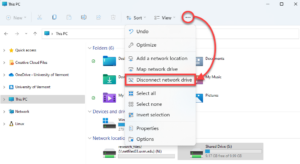
  3. Click the three dots on the toolbar to view more options, and then select Disconnect network drive.

macOS

  1. Open Finder from the dock.
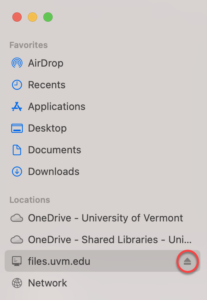
  2. Find the drive you would like to disconnect under Locations on the left side of the Finder window.
  3. Click the Eject icon to the right of the drive’s location.Eject a network folder.

Troubleshooting

Shared drive folders are empty after upgrading to macOS Ventura

If you’ve recently upgraded to macOS Ventura, you may have to disconnect your shared drive and then re-connect using the new address. Older macOS versions worked with cifs://files.uvm.edu/shared, but Ventura requires smb://files.uvm.edu/shared in order to see folder contents.

Updated on July 30, 2024

Related Articles

Not the solution you were looking for?
Don’t worry we’re here to help!
Submit a Help Ticket